Getting started
Who Fink is, signing in, your first hour and how to read the screen.
Welcome to the Folly
Fink's Folly is an observatory builder set in Splinterlands' Praetoria. Fink the Observer, a goblin inventor of great confidence, has bought a crag above New Gobson that hums at night. He means to build an observatory on it that can see every plane of existence. His cousin Vinnie calls it a folly. You are the new help.
You'll spend your time doing five things, in whatever order suits you:
- Building the observatory room by room, up the crag and down into the rock (Part II).
- Working the rooms' workbenches and the neighbours' errands, each one a small puzzle (Part III).
- Observing Lunaki's moon, where the other planes shed shards every night, and hunting the night's hidden mote (Part IV).
- Answering the door. Visitors, offers, news and the occasional disaster come calling (Part III).
- Following the story through six chapters, and after it, waking the Obelisk Shield (Part V and Part VI).
Fink, his cousin Vinnie the archivist and Mags, who whispers, are voiced, and so are Bram the Ironjaw and Picket Fiddlewick. They all turn up in the margins of this Handbook too.
The game keeps going while you're away. Rooms fill their stores, builds finish and callers wait at the door, so you can play in one long sitting or a few minutes at a time.
Signing in
The Folly is played with a Hive account. Your observatory is saved to it, so it follows you to any device you sign in on. Signing in uses Hive Keychain, a browser extension and app that holds your keys: it signs a short message to prove the account is yours. That signature posts nothing and spends nothing.
- No account yet? Create a Hive account ↗, then set up Hive Keychain ↗.
- Your public name is your Hive account, shown as @name on the Chronicle's boards and when someone visits your crag.
- A sign-in lasts 30 days and is renewed each time you play. When it lapses, the title screen asks you to sign in again.
- Want to see before you sign in? Quick look on the title screen shows a sample crag a few weeks on. Nothing is saved there.
Your first hour
The first chapter, A Shack on a Rock, is a walk through the basics. Fink starts you with his Study (a shack with a stove), an old brass telescope, three probes and a little aether and brass. The chapter's goals:
- Fire a probe from the old telescope. Open the telescope from the Study, click a glinting shard, then Fire.
- Build a Rune Foundry. Build ▸ Rune Foundry. Try it on a ley line: it casts faster there.
- Inscribe a rune at the Foundry. Open the Foundry and trace the rune in one stroke.
- Build a Boiler. Rooms that work need steam. The Study's stove won't do for long.
A Rune Foundry takes 20 seconds to build and a Boiler 30: early builds are quick so you can learn the ropes. Later levels take minutes, then hours. While something builds, fire a probe, work a bench or answer whoever is at the door. Each goal pays a little when you meet it, and the chapter pays more when all of its goals are done.
After that, Vinnie arrives, the Glassworks and the Tinker's Workshop open, and the Great Lens goes up. All the way through, the Agenda (on the left of the screen) shows the current chapter's goals and a hint for each.
Reading the screen
The game screen is a cutaway of the crag, with the instruments around its edges.
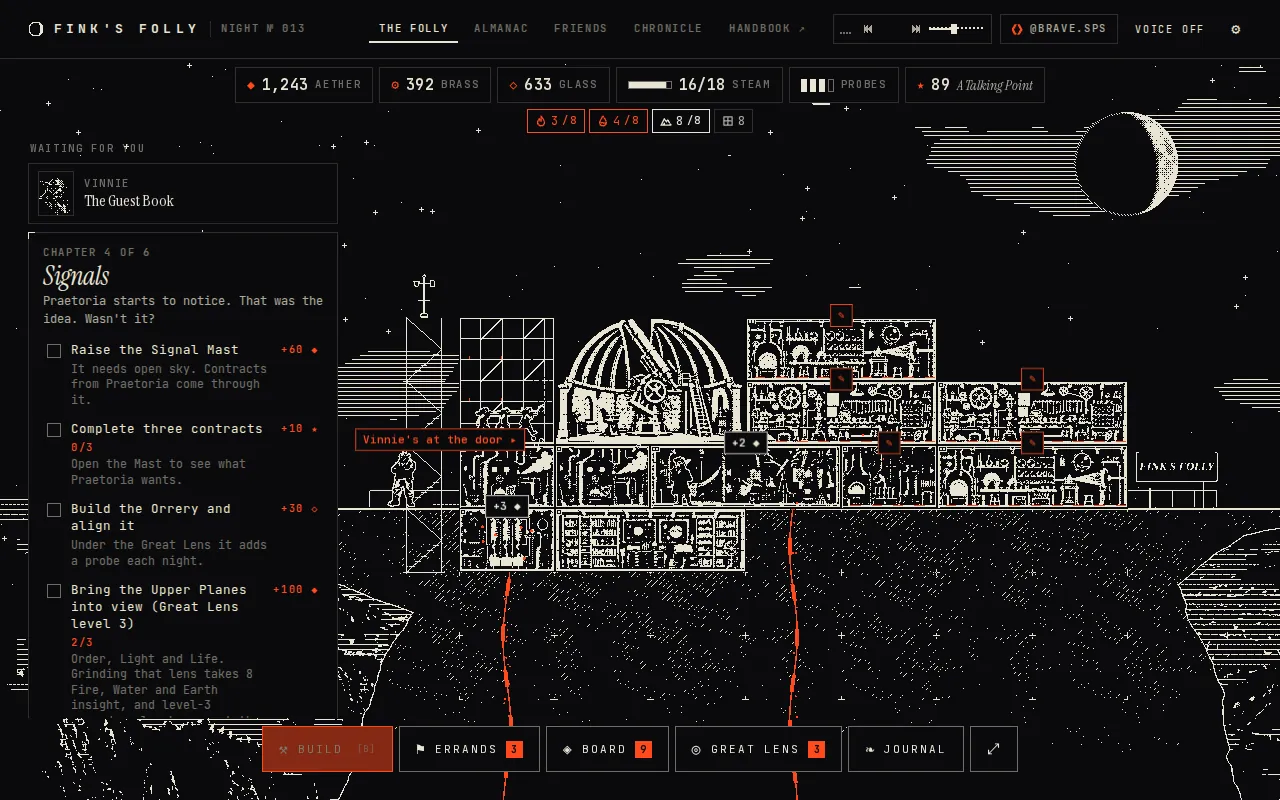
- The purse. Aether, brass, glass, steam used over made, probes ready, renown and your title.
- Insight. What Fink knows of each plane you can see. Hover or tap for the plane's name.
- Waiting for you. Visits, offers and news, and how long each will wait.
- The chapter. Its goals, a hint under each, and what each pays.
- The door. Vinnie or Mags waiting to talk. Tap the tag to answer.
- Ready to collect. What a room has made. Tap the tag to bring it in.
- A work order. A bench has a puzzle waiting. Tap to work it.
- The dock. Build, Errands, the Board, the Great Lens, the Journal, and more as the game opens up.
- This Handbook. From the game, it opens in a new tab.
- Along the top: aether, brass and glass; steam used over steam made; the probes ready to fire; your renown and title. Below them, your insight into each plane. Hover or tap any of them for what it means and where it comes from.
- On the left, the Agenda: the chapter's goals, and everything waiting for you: visits, offers and news, with how long each will wait.
- The crag itself: tap a room to open its panel (the Inspector) on the right, with its store, bench, upgrades and more. Tags over a room show what it has ready to collect: tap one to bring it in.
- The door is at the foot of the stairwell. When someone calls, a tag says so; tap it to answer.
- The dock along the bottom opens Build, Errands, the Board, the Great Lens, Contracts, the Shield and the Journal as they become yours. A number on one says how many things wait there.
- The altimeter on the right shows the storey you're looking at once the crag grows tall.
Drag to pan, scroll or pinch to zoom. B opens Build and Esc closes whatever is on top (see Keys and gestures for the rest). On a phone the panels become sheets that slide up from the bottom.
The crag
The grid, the rock, building, steam, neighbours, resources and every room.
The grid: rock, ledge and sky
Fink's crag is a grid seen side on, like a doll's house with the front taken off. It is 7 columns wide. Every room takes up a block of whole cells: 1 or 2 wide (3 for the Vault) and 1 or 2 tall. The size is on each room's card in Every room and in the build menu.
The grid has three parts, from the bottom up:
- The rock, rows −1 to −3. Solid until you dig it out, one cell at a time (Digging into the rock).
- The ledge, row 0 (storey 1). The flat top of the crag, where the Study stands and most building starts.
- The sky, above the ledge. The Crag itself runs up to storey 6. Higher still are the Heights and the bands above them. They open with Bram's Hoist, which Bram brings once the Great Lens reaches level 5, in chapter 6, the story's last (The Heights and above the clouds).
What a room may stand on
Each room says where it may stand (it's on the room's card as Stands, and in the build menu):
- Anywhere: on the ledge, up in the sky, or down in a dug cell of rock. Boilers, Foundries, Glassworks and most working rooms.
- On the ledge or above: never in the rock. The Study and the Orrery, among others.
- In the rock: only in cells you've dug out. The Containment Cell.
- Open sky above: on the ledge or above, with nothing above it all the way up. The Great Lens, the Signal Mast, the Lightning Spire and a few show rooms.
Three rules hold everything up:
- Above the ledge, every cell along a room's bottom must rest on another room. A two-wide room needs something under both halves. On the ledge itself, the rock holds it.
- Nothing stands on a sky room. Once a Lens or a Mast is up, its columns are capped. Plan where your sky rooms go before you build towers.
- No room straddles the ledge. It sits wholly in the rock or wholly above it.
In the rock, a room needs only dug cells: nothing has to be under it. When a spot won't take a room, the placing panel says why ("Nothing holds it up. Build underneath first.", "That's solid rock. Dig it out first.").
Digging into the rock
The rock opens in chapter 3, Ley of the Land. Choose Dig into the rock at the top of the build menu, then a cell. A cell can be dug if it's in row −1 (just under the ledge) or if it touches a cell already dug, left, right, above or below. So you dig down a column at a time, or tunnel sideways.
A dig takes one of your crews while it runs, and costs aether up front. Deeper rows cost more and take longer:
| Row | Cost | Time |
|---|---|---|
| −1 | 25 aether | 15 s |
| −2 | 80 aether | 1 min 30 s |
| −3 | 220 aether | 6 min |
A Bunkhouse makes digs quicker, as it does builds. The rock is 3 rows deep, so there are 21 cells to dig in all.
What the rock gives up
Every finished dig turns something up, and most finds are bigger the deeper the cell:
- Rubble with a lump of brass in it, a seam of old copper (more brass), a pocket of crystallised aether, or a vein of natural glass.
- About one dig in six, something old: a curio (Curios). The rock holds a fixed set of them, and they have all come out by the time the last cell is dug. Once you have them all, that find is aether instead.
A dug cell with nothing in it is a cave. Caves cost nothing to keep; they're room for rooms. Put anything that stands anywhere into them, and the Containment Cell when it comes.
Under the deepest row lies the Vault. You don't build it and can't dig into it: the story deals with it (Part V).
Tap a dig under way to open its panel: the row, the time left, and the ways to hurry it (Rush for aether, or Ask Vinnie once he lives here). See Building, upgrading and moving for what rushing costs.
Building, upgrading and moving
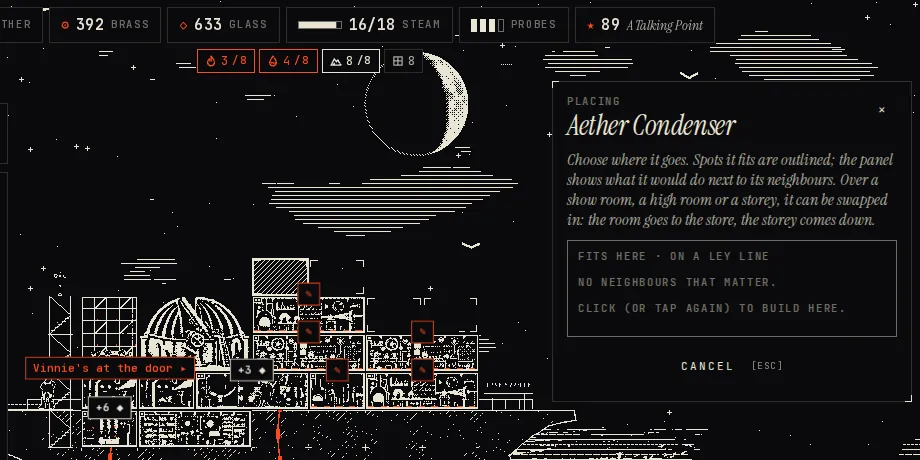
Press B or the Build button on the dock to open the build menu. It lists the rooms with each one's cost and time; one Fink isn't ready for yet is greyed out with the chapter it opens in. A room an open chapter goal wants comes first, marked Goal. Pick one, and the spots where it fits are outlined on the crag.
- With a mouse, click a spot to build there.
- On a touch screen, the first tap previews the room and its fit; a second tap on the same cell builds it.
While you hover, the placing panel says Fits here (and on a ley line if it is), and lists what the room would do next to its neighbours (Neighbours and the ley). The cost comes out of your purse as the builders start. After the story, Fink keeps back what the next keystone needs, so costs are shown against what you can spend (The purse after the story).
Crews
Every build, upgrade and dig needs a crew for as long as it runs. You start with 1. The build menu shows how many are free (Crews 1/1 free). With every crew busy you wait, rush a job, or build more crews:
- The Gobson Bunkhouse gives a second crew at level 1 and a third at level 3.
- It also speeds every build and dig: 10% quicker at level 2, 20% quicker at level 4, 30% quicker at level 5. A Workshop beside it takes off another 5%.
- Show rooms, storeys and the high rooms are put up by hands Fink hires for the job. They never hold one of your crews.
Upgrading
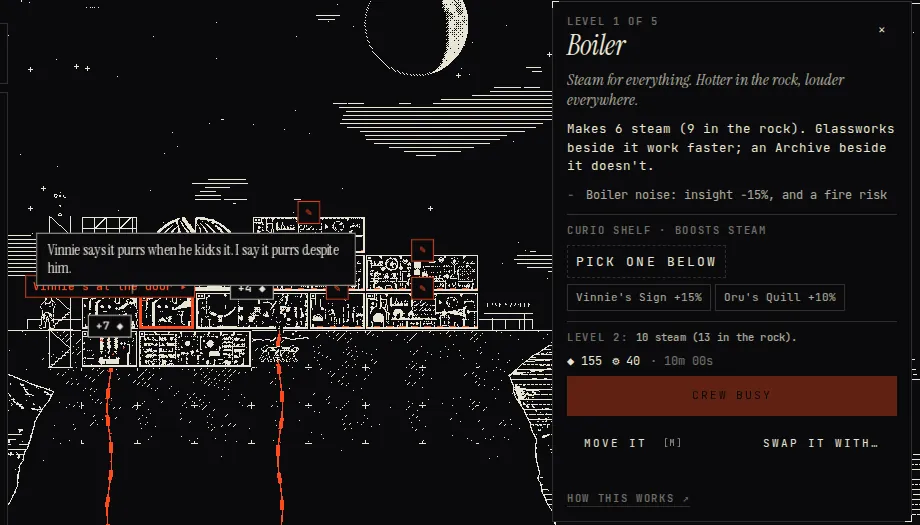
Select a room to open its panel (the Inspector), and Improve to level 2 sits at the bottom with the next level's cost, time and what it does. Most working rooms have five levels; the Study has six. A room keeps working while it's being improved.
Each level costs roughly 2.6, 7, 20 and then 55 times the first, and from level 3 most rooms also want insight into a plane or two. Times climb from seconds to hours. A Glassworks, for example:
| Level | Cost | Time | Glass an hour |
|---|---|---|---|
| 1 | 90 aether, 20 brass | 45 s | 3 |
| 2 | 235 aether, 50 brass | 10 min | 5 |
| 3 | 630 aether, 140 brass, 6 Earth insight | 1 h | 8 |
| 4 | 1,800 aether, 400 brass, 14 Earth insight, 6 Light insight | 4 h | 12 |
| 5 | 4,950 aether, 1,100 brass, 30 Earth insight, 14 Light insight | 10 h | 17 |
A room's level shows on the crag as a row of small pips in a corner of the room, one per level (zoom in to see them). At the top of its ladder a room gets the masterwork trim, a finer frame.
Moving
Select a room and press Move it (or M), then choose its new spot the same way you'd build. A move is free and takes a minute. It needs no crew, but the room does nothing until it's done. You can't move a room while something rests on top of it, while it's being built or improved, or while it's down. The Study moves too; the Vault never does. To trade two rooms of the same size, see Swapping and the store.
Rushing
Any job under way can be finished at once:
- Rush costs 2 aether for every minute left, rounded up. Works on builds, upgrades, digs, moves and repairs.
- Haul it (a move) and Patch it (a repair) pay the same price in brass instead.
- Ask Vinnie, once he has the Guest Room: he finishes any one job for free, once a night. The Guest Room's panel says whether he's done his good deed yet.
Rushing frees the crew straight away. A one-hour upgrade costs 120 aether to rush; a ten-hour one, 1,200. Save Vinnie for the long ones.
Offline jobs
Moves, repairs (after chaos strikes a room: Chaos and repairs) and, after the story, refits (Room fittings) are offline jobs. The room is out of action while one runs: no production, no bench orders, no neighbour effects. But no crew is held, so you can keep building. A refit can't be rushed.
Steam
Steam turns the gears. It isn't stored: every working room uses its share as it's made. The top bar shows it as used over made (6/9 means 6 used of 9 made). Tap it for the details.
- Made by Boilers, and a little by the Study's stove (3 at first).
- Used by most other working rooms, more at higher levels. A few use none: the Guest Room, the Lightning Spire, the Counting House, Bram's Hoist, show rooms, high rooms and storeys.
While used is no more than made, all is well. When used goes over made, every room that fills a store and uses steam slows down by the same share: made ÷ used. Those are the Glassworks, Tinker's Workshop, Aether Condenser, Orrery and Containment Cell. With 9 made and 11 used, as in the picture below, they run at 82%. The lamps on the crag gutter while you're short, and the top bar turns to signal.
A shortfall never stops benches, probes or builds. It just slows your income, so it's easy to miss. Check the bar after every new room or upgrade.
Boilers
A Boiler makes 6, 10, 15, 21, 28 steam at levels 1 to 5. You can have 4. Where it stands matters:
- In the rock it makes 3 more at every level.
- On a ley column it makes half as much again, after the rock's bonus. A level 1 Boiler in the rock on a ley column makes 14.
- Beside a Glassworks, a Condenser or the Guest Room it helps them; beside an Archive it's a fire hazard (Neighbours and the ley).
What each room uses
| Room | Level 1 | Level 2 | Level 3 | Level 4 | Level 5 | Level 6 |
|---|---|---|---|---|---|---|
| Fink's Study | makes 3 | makes 3 | makes 4 | makes 4 | makes 5 | makes 5 |
| Rune Foundry | 1 | 1 | 2 | 2 | 3 | |
| Boiler | makes 6 | makes 10 | makes 15 | makes 21 | makes 28 | |
| Glassworks | 2 | 3 | 4 | 5 | 6 | |
| Tinker's Workshop | 2 | 3 | 4 | 5 | 6 | |
| Aether Condenser | 1 | 2 | 2 | 3 | 4 | |
| The Great Lens | 2 | 3 | 4 | 5 | 6 | |
| Archive | 1 | 1 | 2 | 2 | 3 | |
| Orrery | 1 | 2 | 2 | 3 | 3 | |
| Signal Mast | 1 | 1 | 2 | 2 | 2 | |
| Ward Chamber | 1 | 2 | 3 | 3 | 4 | |
| Containment Cell | 2 | 3 | 3 | 4 | 5 | |
| Gobson Bunkhouse | 0 | 0 | 1 | 1 | 1 |
Neighbours and the ley
Rooms that touch affect each other. Touching means sharing an edge: left, right, above or below. Meeting only at a corner doesn't count. A neighbour counts only while it's working, so one that's down, being moved or still being built does nothing for you.
You don't have to remember these. While placing a room, the panel lists what it would do next to each neighbour (+ for good, − for bad), and a room's panel lists the neighbours it has now. Every pairing in the game:
| Rooms | When they touch | |
|---|---|---|
| Boiler and Glassworks | Boiler heat: glass +25% | + |
| Boiler and Archive | Boiler noise: insight −15%, and a fire risk | − |
| Tinker's Workshop and Rune Foundry | Shared tools: probes cast 15% faster | + |
| Archive and Fink's Study | Fink's notes to hand: insight +10% | + |
| Orrery and The Great Lens | Orrery under the Lens: +1 probe a night, shards +10% | + |
| Boiler and Aether Condenser | Warm coils: aether +10% | + |
| Lightning Spire and Aether Condenser | Storms charge the Condenser: aether +20% in storms | + |
| Ward Chamber and Containment Cell | Warded cell: insight +25% | + |
| Guest Room and Containment Cell | Vinnie won't sleep next to that: smaller parcels | − |
| Guest Room and Boiler | Vinnie loves a warm wall: bigger parcels | + |
| Gobson Bunkhouse and Tinker's Workshop | Builders borrow tools: builds 5% quicker | + |
| Signal Mast and Fink's Study | Fink's correspondence: contracts +10% renown | + |
The Orrery helps the Great Lens wherever it touches it, and since nothing can stand on the Lens, that usually means under it or beside it. The Boiler and Archive's fire risk is real: from chapter 3 a fire can break out in an Archive that has a Boiler beside it (Chaos and repairs).
The ley
Two ley columns run straight up through every crag, at least two columns apart, in different places on every crag. You can see them as faint seams with motes of light rising through the rock. While placing, the panel adds on a ley line when a spot is on one, and a room's panel says so too. A two-wide room counts if either of its columns is a ley column.
A room on the ley works harder:
- Rooms that fill a store make half as much again. The Aether Condenser makes double.
- A Boiler makes half as much steam again.
- A Rune Foundry casts probes half as fast again.
- Every workbench (Foundry, Glassworks, Workshop, Ward Chamber, Orrery) gets new orders half as fast again (Workbench puzzles).
The ley runs through the rock and the Crag, up to storey 6. The Heights and the bands above stand clear of it.
Swapping and the store
Some rooms can be put away and put back. They're the show rooms (blueprints from Picket's cart, backers' gifts and commissioned rooms) and the high rooms above the clouds. Working rooms never go into store: they move the ordinary way (Building, upgrading and moving).
The store
- Pack it away, in a show or high room's panel, takes it down whole. Nothing may rest on it, and it can't be mid-job.
- Stored rooms head the build menu, marked In the store. Putting one up again is free and takes a minute. Hired hands do it, so it holds none of your crews.
Swapping a room in
When you place a new room (or one from the store), you can put it where a show room, a high room or a storey stands. The panel reads Swap it in here and says what goes: show and high rooms go to the store to put up again free; a storey comes down, and nothing comes back for it, carving and all.
- Working rooms are never moved aside, and neither is anything mid-job or struck down.
- The new room has to fit once the others are gone, and has to hold up everything that rested on them.
- On the crag a swap asks twice, with a mouse too: the first click or tap arms that cell, the second swaps.
Swapping two rooms
Swap it with… in a room's panel trades its place with another room of exactly the same size. Each is out of action for a minute, as in a move, and whatever rests on them stays put. The list only offers rooms that would fit each other's spot.
Storeys have one more button, Take it down, which needs a second tap: the storey goes for good. That's for clearing a column so a sky room can crown it (The Heights and above the clouds).
Resources
Rooms that make something fill a store. A tag over the room shows when there's something to collect; tap it, or use the room's panel, or tap aether, brass or glass in the top bar to empty every store at once. During the story a store holds 8 hours of output (the Lightning Spire's three times that); after the story, 24 hours. A full store stops filling, so come back before it does.
What the Folly runs on, and where each comes from:
| Resource | From | For |
|---|---|---|
| Aether ◆ | The Study and Aether Condensers by the hour, the Lightning Spire (six times as much in a storm), shards, bench orders (the Foundry's above all), errands, contracts, goals, the Conundrum and the Survey, finds in the rock, sealed rifts, Vinnie's parcels | Building, improving, digging, rushing; after the story, keystones and the Counting House |
| Brass ⚙ | The Tinker's Workshop and its gear bench, errands, contracts, the Conundrum, the Survey, digging, motes found | Building, improving, rushing a move or repair, contract deliveries, keystones |
| Glass ◇ | The Glassworks and its light bench, errands, contracts, the Conundrum, the Survey, digging, motes found | Building, improving (the Great Lens above all), contract deliveries, keystones |
| Steam ♨ | Boilers and the Study's stove | Keeping producing rooms at full speed. Never stored (Steam) |
| Insight, one for each of the 11 planes | Shards of that plane, the Orrery on nights the plane surges, the Ward Chamber's bench (Order), a specimen in a Containment Cell, sealed rifts, errands. An Archive adds a share to all of it | Most rooms' levels from 3 up (the Ward Chamber's and Containment Cell's from level 1); contracts; keystones |
| Probes ▮ | The Rune Foundry casts them up to its rack, the rack refills each night, and inscribing a rune casts several at once | Firing at the moon through the Lens (Probes and shards) |
| Shards | Collected by probes where they land on the moon | Not kept: each pays out at once as aether and insight into its plane |
| Renown ★ | Goals and chapters, contracts, the Conundrum and the Survey, finding the night's mote, sealed rifts, some visitors | Never spent. It gives the Folly its title and ranks it on the Chronicle |
| Seals | The Notice Board (1 a job, 2 more for a night's three), the stamp card's milestones, faction thank-yous | Picket's cart (Picket's cart and dressing the crag), and carving a stone storey (12 each) |
| Patronage | Renown earned since the story ended | The Shield's Patronage tab: sponsored expeditions, a hurried door, plaques, a second backer (The Obelisk Shield) |
Insight is spent when you use it, but what Fink has learned of a plane in all never goes down: it opens his field notes on that plane in the Planar Almanac, and makes its shards pay more (Seasons and the Planar Almanac). Hover or tap any resource in the top bar for its own list of sources and uses.
The Counting House
After the story, the Gobson Counting House changes aether into brass at 4 for 1, or into glass at 5 for 1, up to 1,000, 2,500 or 5,000 brass and glass together a night, by its level. It only goes one way.
Every room
Every room in the game, read straight from the game's own catalogue. Choose a group: the working rooms you build during the story, the Vault and the rooms that take the crag higher, and the show, gift, high and commissioned rooms that come later. Each card gives when the room opens, where it may stand, what it makes and uses, its levels, its first price and how many the crag will hold. The line under the blurb is what its first level does; the room's panel in the game lists every level.
Built with crews from the chapter they open in, and levelled up from there.
Fink's Study
2 × 1- Opens
- From the start
- Stands
- The ledge or higher
- Makes
- 20 → 70 aether an hour
- Steam
- Makes 3 → 5
- Levels
- 6
- Most
- 1 on the crag
Where genius happens. Also where the stove is, so mind the charts.
Fink sells horoscopes by post: a little aether. Its old stove gives 3 steam. Other rooms can be one level above the Study.
Rune Foundry
1 × 1- Opens
- Chapter 1, A Shack on a Rock
- Stands
- Anywhere
- Bench
- Runes puzzles
- Steam
- Uses 1 → 3
- Levels
- 5
- First build
- 40 aether · 10 brass
- Most
- 2 on the crag
Casts rune probes out of brass, moon-dust and spite.
Holds 4 probes and casts one every 40 minutes. Inscribe a rune to cast probes at once.
Boiler
1 × 1- Opens
- Chapter 1, A Shack on a Rock
- Stands
- Anywhere
- Steam
- Makes 6 → 28
- Levels
- 5
- First build
- 60 aether · 15 brass
- Most
- 4 on the crag
Steam for everything. Hotter in the rock, louder everywhere.
Makes 6 steam (9 in the rock). Glassworks beside it work faster; an Archive beside it doesn't.
Glassworks
2 × 1- Opens
- Chapter 2, The Folly
- Stands
- Anywhere
- Makes
- 3 → 17 glass an hour
- Bench
- Light puzzles
- Steam
- Uses 2 → 6
- Levels
- 5
- First build
- 90 aether · 20 brass
- Most
- 2 on the crag
Furnace, grinding wheels, and every mirror in Praetoria that wasn't nailed down.
Makes 3 glass an hour. Align the kiln's light through the blanks for much more.
Tinker's Workshop
2 × 1- Opens
- Chapter 2, The Folly
- Stands
- Anywhere
- Makes
- 5 → 24 brass an hour
- Bench
- Gears puzzles
- Steam
- Uses 2 → 6
- Levels
- 5
- First build
- 90 aether
- Most
- 2 on the crag
Gears, springs, and a lathe Fink swears he won fairly.
Makes 5 brass an hour. Mesh a gear train for much more. Beside the Foundry, probes cast 15% faster.
Aether Condenser
1 × 1- Opens
- Chapter 3, Ley of the Land
- Stands
- Anywhere
- Makes
- 28 → 132 aether an hour
- Steam
- Uses 1 → 4
- Levels
- 5
- First build
- 150 aether · 30 brass · 20 glass
- Most
- 4 on the crag
Wrings aether out of moonlight. On a ley line it positively gushes.
Condenses 28 aether an hour (double on a ley line).
The Great Lens
2 × 2- Opens
- Chapter 2, The Folly
- Stands
- Open sky above it
- Steam
- Uses 2 → 6
- Levels
- 5
- First build
- 200 aether · 40 brass · 30 glass
- Most
- 1 on the crag
The reason for all of this. Points at the moon; sees considerably further.
Sees the Outer Planes' shards (Fire, Water, Earth). Probes collect within 150 km.
Archive
2 × 1- Opens
- Chapter 3, Ley of the Land
- Stands
- Anywhere
- Steam
- Uses 1 → 3
- Levels
- 5
- First build
- 250 aether · 40 brass · 10 glass
- Most
- 1 on the crag
Every chart, every note, every receipt Vinnie claims he never sent.
+20% insight from every source. Beside the Study, +10% more. A Boiler beside it is a fire hazard.
Orrery
1 × 1- Opens
- Chapter 4, Signals
- Stands
- The ledge or higher
- Makes
- 1 → 4 insight an hour
- Bench
- Orrery puzzles
- Steam
- Uses 1 → 3
- Levels
- 5
- First build
- 300 aether · 60 brass · 40 glass
- Most
- 1 on the crag
Brass planes on brass arms. It knows which plane is restless before the planes do.
Gathers insight into tonight's surging plane. Align the rings for a burst of insight. Under the Great Lens: +1 probe a night.
Signal Mast
1 × 2- Opens
- Chapter 4, Signals
- Stands
- Open sky above it
- Steam
- Uses 1 → 2
- Levels
- 5
- First build
- 280 aether · 80 brass · 10 glass
- Most
- 1 on the crag
Lamps, flags and pigeons. Praetoria can finally hear about Fink.
Two contracts from Praetoria at a time.
Guest Room
1 × 1- Opens
- Chapter 3, Ley of the Land
- Stands
- Anywhere
- Levels
- 5
- First build
- 200 aether · 40 brass
- Most
- 1 on the crag
Vinnie has already claimed it. Fink has not agreed to this.
Vinnie stays: a parcel every night, and once a night he'll finish a build for you.
Ward Chamber
1 × 1- Opens
- Chapter 5, Who Else Is Watching
- Stands
- Anywhere
- Bench
- Runes puzzles
- Steam
- Uses 1 → 4
- Levels
- 5
- First build
- 400 aether · 80 brass · 40 glass · 4 order insight
- Most
- 2 on the crag
Rune circles, silver and stubbornness. Keeps the other planes on their side.
Chaos is a third less likely, and stays away a few hours after a solved work order. Sealing a rift pays insight.
Containment Cell
1 × 1- Opens
- Chapter 5, Who Else Is Watching
- Stands
- A cell dug out of the rock
- Makes
- 1 → 5 insight an hour
- Steam
- Uses 2 → 5
- Levels
- 5
- First build
- 500 aether · 120 brass · 60 glass · 4 chaos insight
- Most
- 3 on the crag
For things that come through rifts. Do not tap the glass.
Holds one specimen from a sealed rift; studying it yields insight into its plane. Specimens you can't house wait in a jar, to swap in.
Gobson Bunkhouse
1 × 1- Opens
- Chapter 4, Signals
- Stands
- Anywhere
- Steam
- Uses 0 → 1
- Levels
- 5
- First build
- 300 aether · 60 brass
- Most
- 1 on the crag
Bunks for the builders. Fewer of them sleep on the scaffolding.
A second crew of builders.
Lightning Spire
1 × 2- Opens
- Chapter 5, Who Else Is Watching
- Stands
- Open sky above it
- Makes
- 4 → 18 aether an hour
- Levels
- 5
- First build
- 450 aether · 150 brass · 30 glass
- Most
- 2 on the crag
Lightning is just aether that hasn't been introduced properly.
A trickle of aether, and six times as much while a storm is overhead.
Gobson Counting House
1 × 1- Opens
- After the story
- Stands
- Anywhere
- Levels
- 3
- First build
- 600 aether · 150 brass
- Most
- 1 on the crag
The Gobson Family will change your aether into anything, at a price. The price is the point.
Changes aether into brass (4 for 1) or glass (5 for 1), one way only, up to 1,000 a night.
Work
Workbench puzzles, errands, the door, chaos, contracts and curios.
Workbench puzzles
Five rooms have a workbench: a small puzzle you can work for a burst of what the room makes. A room makes its goods slowly on its own; its bench is where you earn the rest. Open a room's panel and press Work the bench ▸.
| Room | Puzzle | Opens | Orders held, by level | Minutes per order | Each order pays |
|---|---|---|---|---|---|
| Rune Foundry | Inscribe the rune | Chapter 1 | 2 · 2 · 3 · 3 · 4 | 60 · 54 · 48 · 42 · 36 | 2 probes (3 from difficulty 5, one more for a perfect solve) and some aether |
| Glassworks | Grind and align | Chapter 2 | 2 · 3 · 3 · 4 · 5 | 40 · 36 · 32 · 28 · 24 | glass, and 5 aether |
| Tinker's Workshop | Mesh the gears | Chapter 2 | 2 · 3 · 3 · 4 · 5 | 40 · 36 · 32 · 28 · 24 | brass, and 5 aether |
| Orrery | Align the spheres | Chapter 4 | 1 · 2 · 2 · 3 · 3 | 90 · 80 · 70 · 60 · 50 | insight into tonight's surging plane, and 10 aether |
| Ward Chamber | Inscribe the rune | Chapter 5 | 1 · 1 · 2 · 2 · 3 | 120 · 110 · 100 · 90 · 80 | Order insight, and chaos stays away for a few hours |
Work orders
A bench works on work orders, shown as pips in the room's panel. Each puzzle you solve uses one. Orders come back one at a time, at the pace in the table, until the bench is full again. A new bench starts with one order waiting.
- A full bench stops counting. Its clock starts again from the moment you take an order, so a full bench is wasted time.
- A bench on a ley line gets its orders half as fast again, and a curio on its shelf speeds them up too.
- A room that's out of action (struck by chaos, being moved or repaired) gets no orders while it's down.
- Leave a puzzle half done and it waits on the bench. Back to the bench ▸ picks it up where you left it.
Difficulty and quality
Each bench deals puzzles at a difficulty from 1 to 10, shown as ten pips over the board. It starts at 1 and rises by 2 with each level of the room, plus up to 2 more as you practise that kind of puzzle (one for every four you've solved). Harder puzzles pay more, and the Glassworks, Workshop and Orrery pay 15% more for each level above the first.
How well you solve it is its quality, and the pay is multiplied by it:
- Solved: ×1.
- Tidy: +0.25 if you used no more moves than par. The bench shows your moves against par as you go.
- Quick: +0.25 if you finished inside the target time: 17 seconds at difficulty 1, 45 at 5, 80 at 10 (10 seconds plus 7 a level). The clock runs from when the bench dealt the puzzle, so leaving one for later loses the speed bonus.
A perfect solve is ×1.5. Either bonus also counts as fine work for the Notice Board (The Notice Board and seals).
Bench puzzles are never timed: the clock over the board counts up, and you can always put one down with Leave it ✕. Only some events set a puzzle against the clock (the choice says so); see Events and the door.
Bench trades
From level 3, the Glassworks and the Tinker's Workshop can take other kinds of order, from the errand puzzles: Cargo, Codex pages, Switchbacks, Stews. Pick one under Takes in the room's panel. The pay doesn't change: an order is worth what the room says, whatever the puzzle. Trade when you'd rather pack cargo than grind lenses. A traded order counts as the bench's own work and as a solve of the puzzle you did, for goals and contracts that count them.
After the story
Once the story is told, the Glassworks, Tinker's Workshop, Ward Chamber and Orrery hold a whole day's orders (three benchfuls, arriving evenly through the day). One puzzle works every order waiting, each at 85% of its pay, and the button reads Work all N orders ▸. The Rune Foundry is left as it is, because its orders pay probes. See The purse after the story.
Reading the four benches
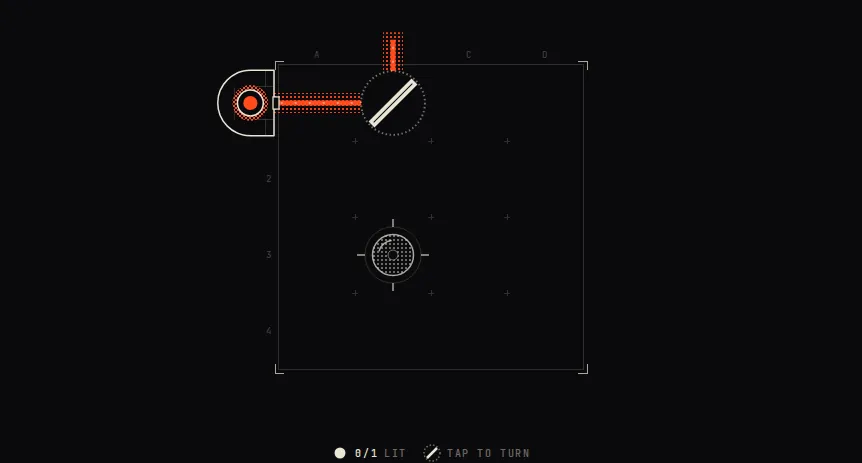
Grind and align (Glassworks). A kiln at the edge of the bench fires a beam of light. Light every lens blank on the bench.
- Tap a mirror to turn it between its two angles. It turns the beam a right angle.
- A splitter (half-silvered glass) lets the beam through and turns a copy of it as well.
- Blocks stop the beam, cracks swallow it, and riveted pieces can't be turned.
- The beam redraws as you turn, and the legend counts the lenses lit. Your moves are the pieces left turned from how they were dealt.
Mesh the gears (Tinker's Workshop). Pegs sit on a honeycomb, so every peg has up to six neighbours. The crank turns clockwise.
- Tap an empty peg to place a gear from the tray; tap your gear to take it back.
- Gears on neighbouring pegs mesh and turn opposite ways. Three in a triangle jam the whole train.
- Every shaft must turn the way its arrow points, and every bell must stay still.
- The status line says what's wrong: jammed, a bell ringing, a shaft turning the wrong way, or how many shafts turn. Your moves are the gears you place.
Inscribe the rune (Rune Foundry and Ward Chamber). Trace every stroke of the rune in one unbroken line.
- Press a rivet and draw along the grooves, or tap rivet after rivet.
- Each stroke once. A double groove takes two passes, and an arrowed stroke goes only one way.
- Lifting the stylus mid-line breaks it. ⟲ Undo brings it back; Wipe ✕ starts over.
- Start at a rivet with an odd number of strokes, if there is one. At the easiest levels the starting rivets are ringed. Every finished rune is tidy, so only speed adds to the quality.
Align the spheres (Orrery). Rings of plane glyphs turn round a centre. Turn them until each ring shows the glyph the chart asks for on the sight-line.
- Tap a ring's right side to turn it clockwise, its left side anticlockwise, or drag it round.
- A linkage drags another ring when you turn one: the list under the chart says which, and by how many steps.
- A locked ring can't be turned by hand, only dragged by a linkage.
- Par is the fewest turns that can do it. The order you turn rings in never matters, only how far each one turns, so work out the count for each ring before you start.
Errands
From Chapter 2, The Folly, the neighbours down in New Gobson bring errands: a job, a puzzle, and pay in goods. Open them from Errands on the dock; a badge says how many wait. Each card says who's asking, where, and what it pays.
- The board holds 2 errands, and 3 from Chapter 4.
- Press Go ▸ to start one. Leave it and it waits: Carry on ▸ picks the same puzzle up again.
- Pass on one you don't want: it leaves the board, and a fresh one comes in its place. Once you've started an errand, it can't be passed.
- A slot fills again 12 minutes after you finish or pass an errand. The board says how long.
- Errands don't expire: one on the board waits as long as you like.
- Errands get harder each chapter, and pay grows as your observatory does. A tidy or quick solve pays more, as at a bench.
While you're out, things turn up. After you've run a couple of errands, Vinnie confesses he has lost his nine spare quills. From then on, nearly half your errands turn one up, until all nine are home. New errands join the board as the story goes on: some once you've met their giver, two once the Great Lens is built.
| Who asks | Errand | Puzzle | From | Pays |
|---|---|---|---|---|
| Vinnie | Re-shelve the Codex | Re-shelve the Codex | Chapter 2 | aether, and insight of tonight's surge |
| A Riverboat Captain | Load the riverboat | Load the riverboat | Chapter 2 | brass and glass |
| A Goblin Chef | Recreate the stew | Recreate the stew | Chapter 2 | aether and a little renown |
| Picket Fiddlewick | Test Picket's lenses | Grind and align | Chapter 2 | glass |
| Vinnie | Plot a chimney's sky | Plot the sky plate | Chapter 2 | aether |
| Picket Fiddlewick | Unjam the switchback | Clear the switchback | Chapter 2 | aether, from Picket's takings |
| Mags | The Oddities shelf | Re-shelve the Codex | Chapter 3 | insight of Darkness and Shadow |
| A Riftwatcher Junker | Pack the junker's barrow | Load the riverboat | Chapter 3 | brass, and some aether |
| Bram the Ironjaw | Gear Bram's bellows | Mesh the gears | Chapter 3 | brass |
| A Kobold Canary Keeper | Chart the canary's shaft | Inscribe the rune | Chapter 3 | aether and brass |
| A Supply Runner | Load the supply wagon | Load the riverboat | Chapter 3 | aether and brass |
| The Ferrous Brewer | Get the Ferrous Brewer's recipe right | Recreate the stew | Chapter 3 | aether and brass |
| A Clockwork Aide | Wind the clockwork aide | Mesh the gears | Chapter 3 | aether and brass |
| An Arcane Curator | Catalogue the curator's finds | Re-shelve the Codex | Chapter 4 | aether and Order insight |
| A Gobson Sniper | Sight the Gobson scopes | Grind and align | Chapter 4 | aether and glass |
| A Rune Arcanist | Recut the warding runes | Inscribe the rune | Chapter 4 | aether and Order insight |
| Tashikka | Survey the resonance with Tashikka | Align the spheres | Chapter 5 | aether, and Earth and Order insight |
| A Dragon Egg Forager | Crate the dragon eggs | Load the riverboat | Chapter 5 | aether and Fire insight |
After the story
Once the story is told, the neighbours call 9 times a night: each errand dealt uses a call, and a slot fills 3 minutes after the last. Calls you don't take carry over to the next night, but only one night, so you never have more than 18 in hand. When the calls run out, the board says the neighbours call again after midnight. Woken regions of Praetoria send errands of their own (The Obelisk Shield).
Errand puzzles
Errands use the four bench puzzles and five of their own. Here is how to read each of the five. All of them score like a bench: tidy and quick each add a quarter (the stew and the sky plate have no par, so every solve of theirs counts as tidy).
Re-shelve the Codex
A stack of pages has come back to Vinnie's Arcane Codex, each one a real Splinterlands card with a line of its lore. File each page on its splinter's shelf: Fire, Water, Earth, Life, Death or Dragon (three to six of them are on offer).
- Read the page, then press a shelf (or its number key). Any page in the stack can be picked out and refiled.
- If you don't know the card, read the clue: each was chosen because it says something about its splinter.
- When every page is filed, press Hand over the stack ▸. Vinnie needs three in five right to accept it, and every page right is the tidy bonus. After he accepts it, the misfiled pages show where they belonged.
Where it comes from: Vinnie's Codex returns, Mags's Oddities shelf and the curator's catalogue.
Load the riverboat
The captain's deck is a grid, and the cargo is a pile of odd-shaped lots on the quay. Get every lot aboard with no gaps and nothing over the side. Barrels already on deck take their cells.
- Drag a lot onto the deck, or click it and then click where it goes.
- Turn the lot in hand with R, a right-click or the Turn button. Lots turn, but they never flip over.
- Drop a lot off the deck (or press Esc) to put it back on the quay. A lot on deck can be lifted again, but each lot set down once is par, so every lift beyond that costs the tidy bonus.
- Fill the corners and edges first: the awkward shapes fit there, and the open middle takes what's left.
Where it comes from: the riverboat, the junker's barrow, the supply wagon and the dragon-egg crates.
Recreate the stew
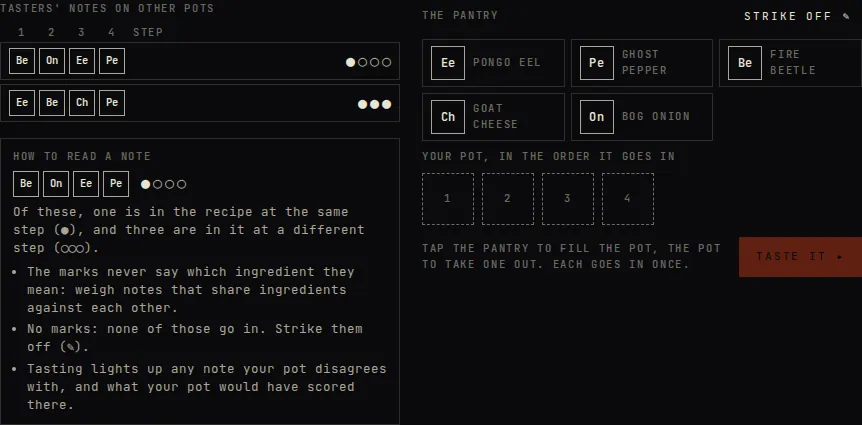
Last night's stew was a triumph, and nobody wrote it down. Work out the recipe: which ingredients go in, and in what order. The tasters' notes are other pots, each marked:
- ● for each of its ingredients that's in the recipe at the same step.
- ○ for each that's in the recipe, but at a different step.
- No marks: none of that pot's ingredients go in at all.
The marks never say which ingredient they mean, so weigh notes that share ingredients against each other. Tap the pantry to fill the pot in order and tap the pot to take one out. Strike off ✎ lets you cross out what can't be in it (a pencil mark, not a rule). Taste it ▸ lights up any note your pot disagrees with, and shows what your pot would have scored there. Tasting costs nothing but time: there's no par to miss, only the clock.
Where it comes from: the Goblin Chef at the arena, and the Ferrous Brewer. Only one recipe ever fits every note.
Plot the sky plate
A sky plate whose stars have worn off. Only the tallies in its margins survived. Each number is a run of stars side by side, in order along its row or column, with at least one gap between runs. Plot the stars so every tally fits.
- Tap a cell for a star, or drag along a row or column to mark several.
- Switch to No star (or right-click) to mark a cell that can't hold a star. Crosses are notes for you; the tallies ignore them.
- A tally dims when its line matches, and lights up when its line, as marked, can't.
- Keys: the arrows, Space for a star, X for none, Ctrl+Z to undo.
- Start with the long runs: a run longer than half its line always covers the middle cells.
Plates run from 5×5 to 10×10. There's no par to miss, and the target time is two and a half times a bench's. The sky plate also draws the nightly sketch of the moon (The nightly sketch).
Where it comes from: Vinnie's star charts (an errand) and the worn plate Picket brings to the door, once the Great Lens is built.
Clear the switchback
The Great Lens draws sightseers, and their carts have jammed the switchback. It's a 6×6 road seen from above. Slide the carts until Picket's cart (marked P) can roll out of the gap on the right.
- Each cart moves only along its own lane, and never through another.
- Drag a cart, or tap it and then tap where it should go. From the keyboard, Tab to a cart and slide it with the arrows.
- Moving the same cart again straight after counts as one move. Undo takes back the last; Start over puts everything back.
- Par is the fewest slides that free Picket, plus a quarter again. The target time is half as long again as a bench's.
- Work backwards: what stands in P's row, and what stops that from moving?
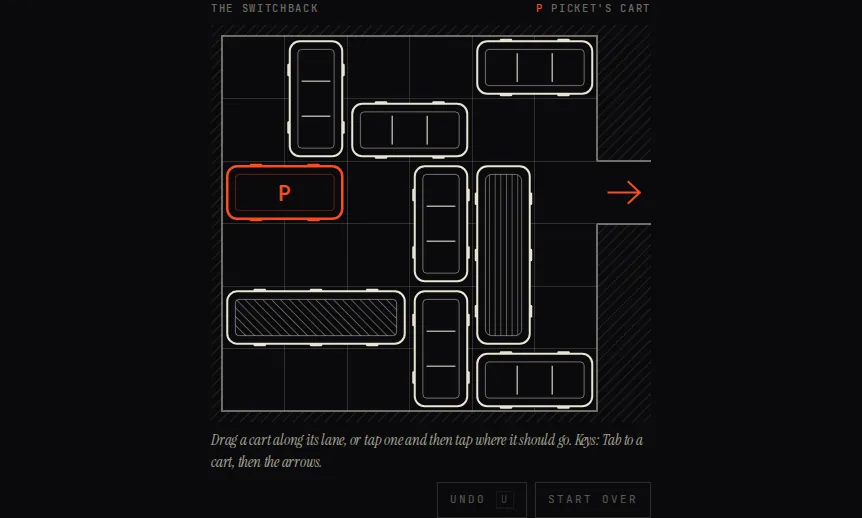
Where it comes from: Picket's switchback errand, and Bram when he can't get his wagon up the hill.
Events and the door
Every hour or two, someone or something comes to the door. A tag at the foot of the stairwell says so, and the caller waits in the Agenda under Waiting for you. There are four kinds:
- A visitor: a neighbour, a traveller or a friend, usually with a choice to make.
- News from Praetoria: word of what's happening beyond the crag, and the holidays.
- An offer: someone selling something. Read the price before you pay it.
- Trouble in the lab: chaos, which strikes a room the moment it arrives (Chaos and repairs).
The story's own scenes are different: they open by themselves when they're due and never take a caller's place.
Answering
Open a caller to hear them out and pick a choice. A choice may cost something (shown beside it, and it waits until you can afford it), need something you don't have yet (it says what), or set a puzzle. Not now closes the dialog and leaves the caller waiting.
- Most callers don't wait forever. The Agenda shows gone in and the time left; the story and chaos wait until you're ready.
- A one-off caller who leaves unanswered can come round again another day. Only an answer is final, so think before you turn something down for good.
- A puzzle in an event is untimed unless the choice says against the clock. Leave an untimed one and choosing it again reopens it free. A timed one is lost if the clock runs out or you give up, and the event takes its worse outcome.
How busy the door gets
- A caller comes about every one to two and a half hours, picked from whoever fits your observatory and chapter.
- At most three callers wait at once. Story scenes, friends' visits and the market don't count toward that. A Guest Room brings company: callers come sooner from its level 2 (up to two fifths sooner at level 5), and at level 4 a fourth may wait.
- With a Guest Room, Vinnie leaves a parcel at the door every night. It waits nearly two days, and the next comes only once that one is opened or gone.
- A Ward Chamber makes chaos rarer (see Chaos and repairs).
After the story
Once the story is told, the door keeps the callers who came while you were away, as many a night as the door holds, so a once-a-day visit misses nothing. Kept callers are never chaos, and never a visit that pays probes. A holiday (in its week of the real calendar) or the season's herald (Seasons and the Planar Almanac) is the night's first caller when it's due.
Chaos and repairs
From Chapter 2, The Folly, things go wrong. A chaos event knocks a room out of action the moment it arrives: the Boiler shrieks, the Workshop jams, a kiln cracks, the rock floods. A room that's out of action makes nothing, uses no steam, and its bench gets no orders. Its panel says so, with Deal with it ▸.
Chaos waits until you answer it, and the room stays down until then. There are usually three ways out:
- Fix it yourself: a puzzle. Solve it and the room is back at once, often with a little pay. It isn't timed (only a rift's is): leave it and the trouble waits in the Agenda until you choose again.
- Pay for it: aether or brass, and the room is back at once.
- Wait it out: free, and the room goes into a repair job for twenty minutes to an hour. Some of these are a gamble (let Vinnie kick the Boiler): they may fix it outright.
Chaos never strikes the Vault, show rooms, storeys, the Hoist or the high rooms, nor a room with a job under way.
Rifts
From Chapter 5, Who Else Is Watching, rifts open in the rooms. Sealing one is a rune puzzle against the clock (about a minute). A seal pays aether, renown and insight into the rift's plane, and leaves a specimen: into an empty Containment Cell if you have one, or a jar until a Cell is free. Run out of time and the rift takes a bite of aether. You can also smother a rift in aether, which is safe and expensive.
Repairs
A repair is an offline job, like a move: the room is out of action, but it holds no crew, so your builders carry on. Hurry it from the room's panel:
- Rush with aether, 2 for each minute left.
- Patch it with brass, at the same rate. Only moves and repairs can be paid for in brass.
- Ask Vinnie, once a night, if he lives in your Guest Room.
Keeping chaos away
The Ward Chamber is the defence. By level:
- Level 1: Chaos is a third less likely, and stays away a few hours after a solved work order. Sealing a rift pays insight.
- Level 2: Rifts are a little easier to seal.
- Level 3: Chaos is half as likely.
- Level 4: Sealing pays double.
- Level 5: Chaos is two thirds less likely.
Every order solved at its bench wards the crag for 2 hours plus the Ward's level: no chaos comes calling while it holds. Some visitors sell a ward by the day, and a few friends' keepsakes help too (Inviting them, and keepsakes). After the story, Desolation fronts stir chaos up on the nights they pass (The Obelisk Shield).
Contracts and standing
From Chapter 4, Signals, the Signal Mast lets Praetoria write to you. Open Contracts from the dock. Each contract asks for something and pays renown and goods, sometimes a curio.
- A contract asks for materials, insight, or work done since it arrived (lenses ground, probes fired). Each line shows how close you are.
- Deliver ▸ when everything's ready. Materials and insight it asked for are handed over; work done is just counted.
- Each contract waits 24 hours, then goes.
- Decline one you don't want: another comes about an hour later. A delivered one is replaced at once (after the story, after midnight).
- Some correspondents remember your choices in the story and pay more or less for it. The contract says who remembers what.
| Signal Mast level | 1 | 2 | 3 | 4 | 5 |
|---|---|---|---|---|---|
| Contracts at a time | 2 | 2 | 3 | 3 | 4 |
| Pay | ×1 | ×1.15 | ×1.15 | ×1.3 | ×1.3 |
A Signal Mast beside the Study adds a tenth to the renown contracts pay.
Faction standing
Six of your correspondents are factions, in three rival pairs. Each delivery for a faction raises its standing by 1 and steps its rival back by 1, never below nothing. The panel shows each faction's standing, and each contract says what delivering it will do. Other senders don't keep count.
- 3: a thank-you. A scene with 5 seals, once.
- 6: their banner. It hangs on your crag while the standing holds at 6 or more. Deliver to the rival and it can come down.
- 10: a commission, after the story. Take it and that faction pays more from then on; decline politely and its rival does. Either way you keep the faction's token, a curio.
The thank-you and the commission come once each, by the highest standing you've ever reached; the banner follows the standing as it is now. These scenes come one a night, and never while the story has a scene waiting. Standing pays in seals, a banner, a curio and contract pay; it never touches renown or the story's pace.
The pairs: Western Fola Command and Mothrook Goathelm; The Gobson Family and Gobson Wagontech; The Conclave Arcana and The Dark Astronomers.
Curios
Curios are the odd things that come your way: dug out of the rock, given by visitors, earned in the story, paid by contracts, turned up on errands, sold at the door. Each one, on a room's shelf, gives that room a small boost, from +5% to +30%.
- A room has 1 shelf slot from level 1 and 2 from level 3. Show rooms, the Hoist, storeys, the rooms above the clouds and the Vault have no shelf.
- Every curio has a home: the rooms it belongs in. In its home room the boost doubles. The shelf shows each curio's boost for that room before you place it.
- Taking a curio back is free, any time. Each one on a shelf shows as a small stud on the room in the scene.
| Room | A curio on its shelf boosts |
|---|---|
| Fink's Study | aether |
| Rune Foundry | probe casting and work orders |
| Boiler | steam |
| Glassworks | glass and work orders |
| Tinker's Workshop | brass and work orders |
| Aether Condenser | aether |
| The Great Lens | shard value |
| Archive | insight |
| Orrery | insight and work orders |
| Signal Mast | contract pay |
| Guest Room | Vinnie's parcels |
| Ward Chamber | work orders |
| Containment Cell | insight |
| Gobson Bunkhouse | build speed |
| Lightning Spire | aether |
| Gobson Counting House | what it will change a night |
Work orders means the bench's orders come faster.
The cabinet
Every curio you own is in the Journal's Curio cabinet, with a count of how many you've found. A few come only one way:
- 6 are only ever dug out of the rock (Digging into the rock).
- Relics come only from a Legendary or Gold Foil mote (Relics).
- Each season leaves a token when you find the mote on 3 of its nights (Seasons and the Planar Almanac).
- Some events offer one of two curios: the cabinet counts that pair as one slot, whichever you chose.
The Menagerie
Every plane's specimen the crag has ever held, in a Containment Cell or the jar, gets a page in the Journal's Menagerie, and it stays there after the specimen is gone. Rifts bring 7 of the 11 planes during the story; after it, the season's herald can sell you one you're missing. Hold all 11 and Fink closes the book with a scene of his own, a plaque on the sign and a curio for the cabinet. It pays nothing else.
The moon
Probes and shards, the Great Lens, the mote hunt, relics, the sketch and the seasons.
Probes and shards
Lunaki's moon hangs over New Gobson, and every night the other planes shed shards onto it. You gather them by firing probes: a probe lands where you aim and collects every shard in reach. Shards pay aether, and each one teaches a little insight into the plane it fell from.
Firing a probe
- Open the moon: the Telescope button on the dock (Great Lens once the Lens is up), or Use the old telescope ▸ in the Study's panel (Look through the Great Lens ▸ in the Lens's).
- Drag to turn the moon. Hover a shard to see its plane, whether it's large and whether it's surging.
- Click a shard to aim. The Fire button counts the shards your probe will reach (Fire · 3 shards).
- Click the same spot again, press Fire, or press Enter or Space.
Each shard can be collected once a night. A shard you've taken is gone from your moon, though not from anyone else's.
Where probes come from
Fink starts with 3 probes and no way to make more. At midnight UTC, when a new night begins, the rack refills to what it holds. Build a Rune Foundry and it holds more and casts new ones through the day:
| Foundry | Holds | Casts a probe every |
|---|---|---|
| None | 3 | never: only the midnight refill |
| Level 1 | 4 | 40 minutes |
| Level 2 | 5 | 34 minutes |
| Level 3 | 6 | 28 minutes |
| Level 4 | 7 | 23 minutes |
| Level 5 | 9 | 18 minutes |
- A Tinker's Workshop beside the Foundry makes it cast 15% faster, and a Foundry on a ley line casts half as fast again.
- Inscribing a rune at the Foundry's bench pays probes at once: two, and more for a hard rune or a clean, quick one. These can take you past what the rack holds (the extra shows as +1, +2 beside the rack at the top of the screen). See Workbench puzzles.
- An Orrery next to the Great Lens adds one probe to each midnight refill.
The rack along the top of the screen shows the probes ready; hover or tap it for when the next one is cast. A full rack casts nothing, so fire before it fills.
The night's field
Each night 26 shards fall, in four tiers. Where they land is decided by the night alone, so every observer sees the same field, and each collects their own. More of them land on the near side, the face turned toward you when the moon opens.
| Tier | Planes | Shards a night | Aether: small · large |
|---|---|---|---|
| Outer planes | Fire, Water and Earth | 10 | 8 · 20 |
| Upper planes | Order, Light and Life | 6 | 10 · 25 |
| Lower planes | Chaos, Darkness and Death | 6 | 10 · 25 |
| Inner planes | Fey and Shadow | 4 | 14 · 35 |
Those are the values before bonuses. A shard also teaches one insight into its plane (two for a large one), multiplied by your Archive. On top of the base value:
- The surge. One plane surges each night, and every plane surges once in every eleven nights. With a working Orrery, the surging plane's shards pay double and the Lens says so in its header ("Fire is surging (double)"). Without a working Orrery, nobody tracks it and no shard pays double. From level 2 the Orrery's panel names tomorrow night's surging plane too.
- Study. The better Fink knows a plane, the more its shards pay (see Seasons and the Planar Almanac).
- The season. The plane whose season it is pays 25% more.
- The Lens's neighbours and shelf. An Orrery next to the Lens adds 10%, and curios on the Lens's shelf add their boost.
Shards from planes your Lens can't see yet still fall: the header counts them as out of sight. Raising the Lens brings them into view (next section).
The Great Lens and the mote hunt
The Great Lens goes up in the second chapter and replaces Fink's old brass telescope. Each level sees further: it brings new planes into view, widens the reach of every probe, and from level 2 fits the echo coil, which hears the night's mote.
The Great Lens, level by level
| Level | New in view | Probes collect within | The mote | Insight to reach it |
|---|---|---|---|---|
| The telescope | Outer planes: Fire, Water and Earth | 120 km | not heard | — |
| Level 1 | — | 150 km | not heard | — |
| Level 2 | — | 180 km | echoes; reached within 150 km | — |
| Level 3 | Upper planes: Order, Light and Life | 220 km | echoes; reached within 170 km | 8 Fire, 8 Water and 8 Earth |
| Level 4 | Lower planes: Chaos, Darkness and Death | 260 km | echoes; reached within 190 km | 10 Order, 10 Light and 10 Life |
| Level 5 | Inner planes: Fey and Shadow | 300 km | echoes; reached within 215 km | 12 Chaos, 12 Darkness and 12 Death |
Each new tier of planes is paid for in insight from the tier before, so the shards you can already see are what open the next ones. Upgrading spends insight, but what Fink has studied never goes down.
The mote
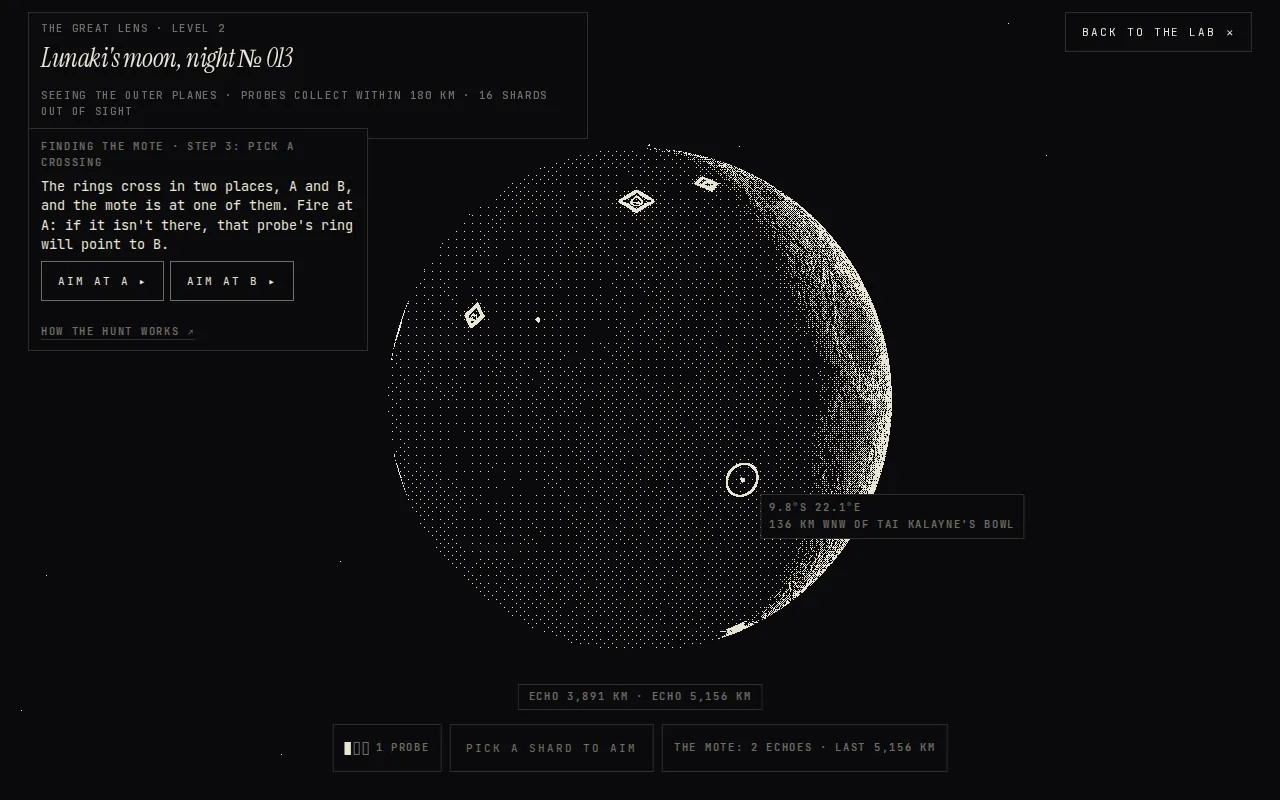
Every night one mote of the Beyond lodges somewhere in the moon, the same one for every observer. You can't see it. Once the echo coil is fitted, every probe you fire while the mote is still out there rings back how far from it the probe landed: an echo. The Lens's footer keeps count ("The mote: 2 echoes · last 1,240 km"). A probe that lands close enough reaches the mote and secures the night's relic.
An echo is a distance, so the mote lies somewhere on a circle of that radius round the probe: its echo ring, drawn on the moon. Two rings cross in two places, and a third probe tells you which.
You don't need to work this out by eye. While the mote is out, the Lens shows a panel headed Finding the mote that reads the rings for you and says what to do next:
- step 1: any probe. No echo yet. Fire anywhere; a shard is a good target, since the probe collects as it echoes.
- step 2: fire on the ring. One ring. The Lens marks a spot on it (try here); fire there or anywhere on the ring well away from your first probe. Two probes too close together make rings that cross at a shallow angle, and the Lens can't trust where.
- step 3: pick a crossing. The rings cross in two places, lettered A and B on the moon. Fire at A; if the mote isn't there, that probe's ring rules A out and points to B. When every ring passes through one place, the step reads fire at the mark and the moon shows here.
The Aim at A ▸ (or Aim at the spot ▸) buttons turn the moon to a mark and aim at it; clicking a mark on the moon does the same. Then fire with the button, Enter or Space. Echoes are rounded, so now and then the rings don't quite agree; the panel then says to fire where the two newest rings cross. On a phone the panel folds to its buttons after you aim (What next? ▾ opens it again).
Relics
Reaching the mote secures the night's relic. Every night has one relic, with its own name, element and epigraph, and everyone who finds that night's mote catalogues the same one. What differs is yours alone: its rarity, set by how many echoes it took, and whether it came in Gold Foil.
| Rarity | How | Aether | Gold Foil chance |
|---|---|---|---|
| Legendary | Mote secured with a single echo. | 160 | 50% |
| Epic | Mote secured in two echoes. | 120 | 25% |
| Rare | Mote secured in three echoes. | 90 | 12% |
| Common | Mote secured in four echoes or more. | 60 | 6% |
| Fragment | The night ended before the mote was found. | — | — |
- The echo that reaches the mote counts too: reaching it with your very first echo is Legendary.
- A mote also pays some glass, brass and renown, more for a rarer relic and a little extra renown for Gold Foil.
- Gold Foil doubles the aether in the table. A foil relic is inked in gold on its card.
- Vigil is the run of nights in a row on which you've fired at least one probe. Each night of it adds 5 aether to a found mote and 1% to the foil chance, up to 10 nights.
- A Legendary or Gold Foil mote may also leave a relic curio for the cabinet, one you don't have yet.
- If the night ends with echoes taken but no mote, you keep only a Fragment, which pays nothing.
Each mote comes from one of the six splinters (Fire, Water, Earth, Life, Death and Dragon), and each splinter has one night in every six. The Almanac's Six Motes keeps the tally: one of each makes a spectrum.
The reveal, the relic page and sharing
When a probe reaches the mote, its card turns over: the relic's plate, drawn from the moon round the spot where it lodged with your echoing probes on it, then its rarity and what it paid. Three buttons follow:
- Keep collecting ▸ goes back to the moon. Tonight's relic ▸ in the Lens's footer opens the card again.
- Share copies a short summary (on a phone, it opens the share sheet): the night, your echoes as little moons that fill the closer each probe landed, the rarity and a link. It never says where the mote was.
- Relic page opens
/relic/<night>: the relic's name, element, the moon's phase that night and how many observers hunted it and secured it.
Tonight's relic page stays sealed until you've found the mote yourself, and the Chronicle's map of where probes landed leaves out tonight's. Once the night has closed, its page shows where the mote lodged to anyone.
The nightly sketch
From the second chapter, when Vinnie arrives to hold the lamp, Fink sketches one feature of the moon a night. The sketch is a sky plate: a grid with tallies along each row and column, where you fill in the ink until every tally fits (the same puzzle as the star-chart errands; see Errand puzzles).
- Open it from the Great Lens's panel: Tonight's sketch: The Pie Dish ▸. Before the Lens is built, the button is in the Study's panel.
- One a night. After that the panel reads "Tonight's sketch is done. Another after midnight."
- Each sketch is a page with Fink's note, kept in the Journal's The moon, sketched tab. There are 24 features on the near side, drawn in a fixed order.
- From Great Lens level 5, the far side comes first: the Far Side Atlas, 6 more plates (the button reads The Far Side Atlas: …). The first 2 each teach one insight into Fey or Shadow, whichever Fink knows less of.
That insight is all a sketch ever pays. The drawings are the same for everyone, so they reward patience, not speed. Take as long as you like, and nothing is lost by leaving one on the drawing board: Back to the sketch ▸ picks it up again.
After the story, the Starward Eye at the very top of the crag charts the sky the same way: one of 24 constellations a night, each a page in the Journal's The stars tab, and a line on Vinnie's sign once every one is charted. It pays nothing else (see The Heights and above the clouds).
Seasons and the Planar Almanac
Every lunation, new moon to new moon (about 29½ nights), belongs to one plane: its season. The Agenda shows it under the chapter ("The season of Fey · until the new moon", with the date). Every plane gets one season in each run of eleven, never two in a row, and the order is the same for everyone.
- The season's plane pays 25% more for every shard until the new moon.
- From the second chapter, a Herald of the Season comes to the door once a season. It sells a phial of the plane's insight for aether, or tells you for nothing where its shards tend to fall (a little insight too). Like other offers it waits only so long.
- Find the mote on 3 nights of a season and it leaves its token, a curio for the cabinet that does most on the Great Lens's shelf. The Agenda counts your motes this season; the count starts again with each new season.
The Planar Almanac
The Planar Almanac (Almanac in the site's top bar, at /almanac) is your record of the moon. It holds:
- Observer's record: your renown and title, relics secured, nights hunted, how often you secured the mote, your vigil (and your best), and a chart of the echoes each relic took.
- Planar studies: a card for each plane with Fink's field notes, which open as you learn more.
- The Six Motes and the current Lunation: a slot for each night, with its element and your rarity.
- Your relics: every relic you've secured or kept a fragment of. Tap one for its card.
- The Obelisk Shield, after the story, and Fink's journal.
A plane's study counts all the insight it has ever taught you (spending insight doesn't lower it). Each step opens a page of notes and makes that plane's shards worth more:
| Study | Insight learnt | Shards worth |
|---|---|---|
| Unknown | under 3 | — |
| Glimpsed | 3 | +10% |
| Charted | 12 | +25% |
| Understood | 40 | +50% |
A plane your Lens can't see yet shows as sealed. The sixth chapter asks you to chart every plane (see The six chapters), and this is where you check which ones still need it.
The story
How the six chapters move on, and backing a neighbour. No plot, only how it works.
How chapters work
The story runs in six chapters. Each has a handful of goals: build this room, fit that, find a mote, answer someone at the door. You can do them in any order, at any pace. Nothing in the story runs out of time.
Goals
- The Agenda, on the left (the chapter pill on a phone), lists the chapter's goals. Under each open goal is a hint and what it pays; a goal that counts something shows how far along you are (2/3).
- Tap a goal to be shown where it happens: the room it needs is selected, or the build menu opens if you haven't built it yet, and Fink repeats the hint.
- Goals are checked after everything you do, so a goal you'd already met (a room built early, a Lens already that high) ticks off the moment its chapter opens.
- Each goal pays when you meet it. In the build menu, a room a goal is waiting for comes first, marked "Goal".
Closing a chapter
When the last goal is met, the chapter pays its own reward, its closing scene arrives, the next chapter opens with a scene of its own, and a new page goes into Fink's journal. Story scenes open themselves; you can't miss one. Each chapter also opens new rooms in the build menu, and some open whole parts of the game:
- Chapter 2 brings Vinnie, and with him errands (Errands), the Notice Board (The Notice Board and seals), the nightly sketch (The nightly sketch) and the season's herald.
- Chapter 3 opens the rock to digging (Digging into the rock) and brings the choice of a neighbour to back (Backing a neighbour).
- Chapter 4 adds a third errand to the board, brings contracts with the Signal Mast (Contracts and standing) and opens the Weekly Survey (The Conundrum and the Weekly Survey).
- Chapter 6 brings Bram's Hoist and the first storeys once the Great Lens is at level 5 (The Heights and above the clouds).
Renown and titles
Renown is what Praetoria thinks of the place. It comes mostly from goals and chapters, motes, contracts and callers at the door (a few choices there cost a little). As it grows, the Folly earns a new title, shown beside your renown at the top of the screen and on the Almanac:
| Renown | Praetoria calls it |
|---|---|
| 0 | A Folly |
| 25 | A Curiosity |
| 80 | A Talking Point |
| 200 | An Observatory |
| 450 | A Fine Observatory |
| 900 | An Institution |
| 1,600 | The Grand Observatory |
After the story, the Obelisk Shield gives the Folly titles of its own, and renown earned from then on becomes patronage (The Obelisk Shield).
What each chapter pays when its last goal is met:
| Chapter | Its reward |
|---|---|
| 1 · A Shack on a Rock | 100 aether, 20 brass, 5 renown |
| 2 · The Folly | 200 aether, 40 brass, 20 glass, 10 renown |
| 3 · Ley of the Land | 400 aether, 80 brass, 60 glass, 20 renown |
| 4 · Signals | 900 aether, 180 brass, 120 glass, 30 renown |
| 5 · Who Else Is Watching | 2,000 aether, 400 brass, 300 glass, 50 renown |
| 6 · The Far Side | 5,000 aether, 1,000 brass, 800 glass, 150 renown |
The six chapters
Here are the six chapters, one line each. Their goals are folded away, in case you'd rather meet them in the game; each goal comes with the hint the Agenda gives and what it pays.
Chapter 1 · A Shack on a Rock
Every grand observatory starts somewhere. Fink's started here, unfortunately.
Show the goals
- Fire a probe from the old telescope. Open the telescope from the Study, click a glinting shard, then Fire. (20 aether)
- Build a Rune Foundry. Build ▸ Rune Foundry. Try it on a ley line: it casts faster there. (30 aether)
- Inscribe a rune at the Foundry. Open the Foundry and trace the rune in one stroke. (20 aether)
- Build a Boiler. Rooms that work need steam. The Study's stove won't do for long. (30 aether, 10 brass)
Rooms that open: Rune Foundry, Boiler.
When every goal is met: 100 aether, 20 brass, 5 renown.
Chapter 2 · The Folly
Vinnie has a name for the place. Fink has a lens to grind.
Show the goals
- Build the Glassworks. Two cells wide. Beside a Boiler it works a quarter faster. (30 aether)
- Grind your first lens. Open the Glassworks and steer the kiln's light through the blanks. (25 aether)
- Build the Tinker's Workshop. Beside the Foundry, probes cast faster. (30 aether)
- Cut your first gear train. Open the Workshop and mesh the gears. (15 brass)
- Raise the Great Lens. It needs open sky above it, so it goes on top. (60 aether, 5 renown)
- Collect 10 shards. Every probe collects the shards it lands near. (10 glass)
Rooms that open: Glassworks, Tinker's Workshop, The Great Lens.
When every goal is met: 200 aether, 40 brass, 20 glass, 10 renown.
Chapter 3 · Ley of the Land
Something under the crag hums at night. Fink calls it acoustics.
Show the goals
- Dig three cells out of the rock. Build ▸ Dig. Start right under the ledge. (20 brass)
- Build an Aether Condenser on a ley line. The glowing seams in the rock are ley lines. On one, a Condenser makes double. (60 aether)
- Improve the Study to level 2. Every other room is capped one level above the Study. (40 aether)
- Fit the echo coil (Great Lens level 2). Then every probe rings back how far it fell from tonight's mote. (20 glass)
- Find a night's mote. Each echo is a ring the mote lies on. The Lens marks where the rings cross: fire at a mark. (10 renown)
- Build the Archive. Beside the Study, Fink's notes are to hand. Not beside the Boiler. (50 aether)
Rooms that open: Aether Condenser, Archive, Guest Room.
When every goal is met: 400 aether, 80 brass, 60 glass, 20 renown.
Chapter 4 · Signals
Praetoria starts to notice. That was the idea. Wasn't it?
Show the goals
- Raise the Signal Mast. It needs open sky. Contracts from Praetoria come through it. (60 aether)
- Complete three contracts. Open the Mast to see what Praetoria wants. (10 renown)
- Build the Orrery and align it. Under the Great Lens it adds a probe each night. (30 glass)
- Bring the Upper Planes into view (Great Lens level 3). Order, Light and Life. Grinding that lens takes 8 Fire, Water and Earth insight, and level-3 upgrades elsewhere want the same, so save some. (100 aether)
- Survive the Riftwatchers' inspection. A letter comes first, then the auditor. Answer the door when they knock. (15 renown)
- Reach 80 renown. Contracts, motes and the right answers to the right visitors. (120 aether)
Rooms that open: Orrery, Signal Mast, Gobson Bunkhouse.
When every goal is met: 900 aether, 180 brass, 120 glass, 30 renown.
Chapter 5 · Who Else Is Watching
A new lens in the hills across the valley, pointed at Fink.
Show the goals
- Build the Ward Chamber. It makes chaos rarer, and sealing rifts pays. (120 aether)
- Seal three rifts. When a rift opens in a room, trace the seal before the clock runs out. (15 renown)
- Hold a specimen in a Containment Cell. It belongs in the rock. Sealed rifts sometimes leave something behind. (60 glass)
- Bring the Lower Planes into view (Great Lens level 4). Chaos, Darkness and Death. Fink is sure this is fine. (200 aether)
- Find out who's been watching. Mags is asking questions. Answer hers. (25 renown)
Rooms that open: Ward Chamber, Containment Cell, Lightning Spire.
When every goal is met: 2,000 aether, 400 brass, 300 glass, 50 renown.
Chapter 6 · The Far Side
The ward under the crag was built to keep something shut. It's knocking.
Show the goals
- See everything (Great Lens level 5). The Inner Planes: Fey and Shadow. (400 aether)
- Open the Vault. Dig down to the ruin and turn its rings. (40 renown)
- Chart every plane (12 insight into each). The Almanac shows what Fink still doesn't know. Fey and Shadow shed only a few shards a night: aim for theirs, and a better Archive learns more from each. (300 aether)
- Make Praetoria listen. When the time comes, choose your words. (100 renown)
Rooms that open: Bram's Hoist (once the Great Lens is at level 5).
When every goal is met: 5,000 aether, 1,000 brass, 800 glass, 150 renown.
When the sixth chapter closes, the story is told, and the Folly turns to the Obelisk Shield. Part VI picks up from there.
Backing a neighbour
In the third chapter, once Mags has come up the hill, Vinnie brings a choice: three neighbours who would supply the Folly, if Fink backs one of them. Choose one:
- Bram the Ironjaw, the dwarven smith. He bolts his iron weathervane to the roof.
- Picket Fiddlewick, the gnome who sells curios, mostly genuine. He strings his lanterns along the eaves.
- Mags, who finds what the record left out. She sets a box of moonflowers on the Study's sill.
Their mark goes up on your crag. From then on their own story runs alongside the chapters, one scene at a time:
- The choice itself, in chapter 3.
- A scene at the opening of chapter 4.
- A scene at the opening of chapter 5, ending in a choice that stays with the crag: it sways one of Praetoria's factions, whose contracts then pay a little more (the Contracts panel says why).
- A scene at the opening of chapter 6: a job in their trade, a puzzle of the kind they know best. You can turn it down; it only pays a little less.
- After the story: their blueprint, a show room for the Heights (Bram's Belfry, the Lantern Gallery or the Whispering Gallery). See The Heights and above the clouds.
The scenes are story scenes: they open themselves, never take a caller's place at the door, and come at most one a night, never while another story scene is waiting. While the story runs they pay only a little renown, never materials or insight, so whoever you back, the chapters move at the same pace. There is no wrong choice: pick the neighbour whose story you want to hear.
After the story
The Obelisk Shield, the purse, the Heights and above, fittings, Grandeur and folios.
The Obelisk Shield
Once the sixth chapter's last scene is answered, the story is told, but the game goes on. A new button, Shield, appears on the dock. Seven sister obelisks of the Obelisk Shield wait across Praetoria, and the endgame is waking them, one a week.
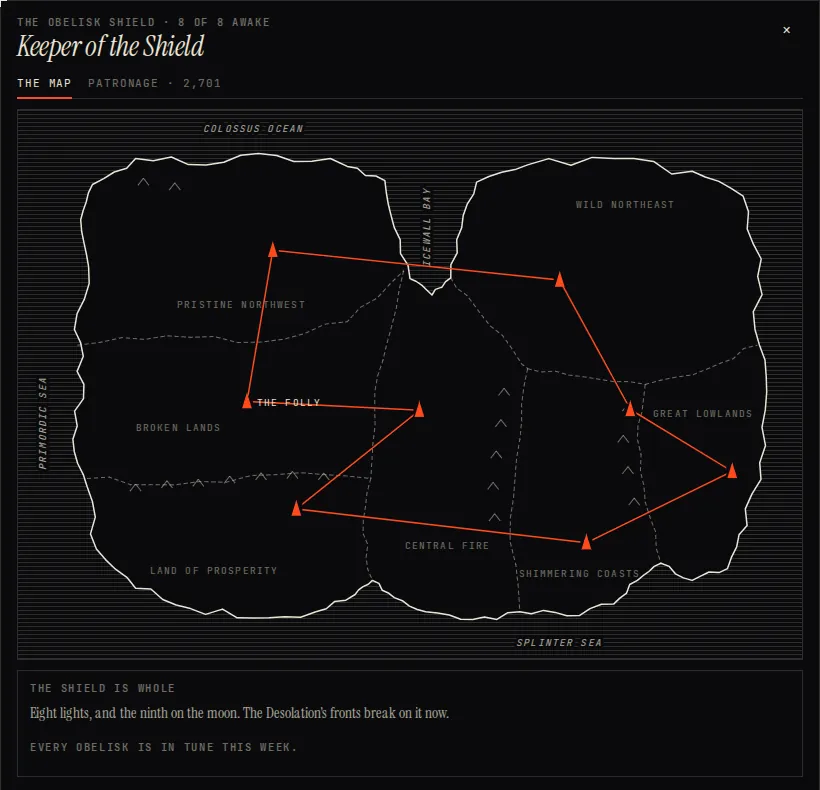
The Shield panel has the map of Praetoria, the obelisk you're working on, the list of all seven and the next Desolation front.
1 · Listen for it
The first sister can be heard as soon as the Shield opens. Each one after it stirs at the start of the week after its sister woke (weeks run seven nights), and until then the panel says how long it has to go. Once it stirs, it lies somewhere inside a dotted ring on the map.
- Tap the map to ping. The Great Lens hears how far off the obelisk is, in leagues, and the panel draws a circle of that size round the point you tapped. The obelisk lies on that circle. It never tells you the direction.
- You get 3 pings a night, and unused ones don't carry over. The Great Lens has to be working to listen.
- A ping within 66 leagues finds it. Two pings from outside the ring cross at one place inside it, so a careful listener finds it on the first night.
Finding it pays a little renown, and the panel tells you where it lies. The keystone's insight is known before that: even before the obelisk stirs, the panel says what to start saving.
2 · Forge the keystone
Forge the keystone in the Vault. It costs aether, brass and glass, plus insight in the obelisk's two planes, and takes hours. A Lightning Spire takes 8% off the time for each of its levels. The Vault forges one keystone at a time.
| Sister | Keystone | Insight | Forge | Road |
|---|---|---|---|---|
| 1 | 12,000 aether · 3,600 brass · 1,800 glass | 16 Earth · 16 Life | 14 h | 12 h |
| 2 | 16,000 aether · 4,800 brass · 2,400 glass | 22 Water · 22 Order | 18 h | 16 h |
| 3 | 21,000 aether · 6,300 brass · 3,150 glass | 28 Death · 28 Fire | 22 h | 20 h |
| 4 | 26,000 aether · 7,800 brass · 3,900 glass | 34 Life · 34 Fey | 26 h | 24 h |
| 5 | 32,000 aether · 9,600 brass · 4,800 glass | 40 Water · 40 Shadow | 30 h | 28 h |
| 6 | 39,000 aether · 11,700 brass · 5,850 glass | 46 Earth · 46 Darkness | 34 h | 32 h |
| 7 | 48,000 aether · 14,400 brass · 7,200 glass | 52 Fire · 52 Chaos | 38 h | 36 h |
The road's hours are before your escort, a Bunkhouse at level 4 or 5 and a sponsor shorten them. The costs above are what the set-aside holds back for you (see The purse after the story).
3 · The expedition
Fink goes himself, with one escort. You can choose who at the forge, and they set off the moment the keystone is done, even while you're away. Or choose once it's forged. The panel lists everyone willing to go, with the hours the road takes each of them.
- Who can come: Vinnie always. Mags and Bram once you've met them, and others as the story makes friends of them.
- Perks: each escort brings one. Some make the journey shorter, some deal with trouble on the road, some make the rings at the door a step easier, one brings back a share of the keystone's brass, one brings insight.
- Terrain: each road crosses its own ground (ice, bog, badlands and so on). An escort who knows it is quicker there, and the panel says so ("Knows the ice"). Some are slower on ground they don't know.
- Resting: whoever went on the last trip rests for this one, unless nobody else would come.
Halfway there, a road event comes: a river, a toll, a storm, an ambush. Some are choices, some are small puzzles, and getting one wrong can add a few hours to the journey. There are 12 of them, and none comes twice until you've seen them all.
4 · The site
On arrival there's a site before the door, each with a puzzle of its own kind. In order of the sisters: Load the riverboat, Grind and align, Clear the switchback, Re-shelve the Codex, Recreate the stew, Plot the sky plate and Align the spheres (Errand puzzles and Workbench puzzles explain each), harder the further down the road. An escort who knows the place says something of their own there and makes the puzzle a step easier.
- Solve it and the obelisk's beacon lights on the crag's rim, and the door comes at once.
- Make camp and go the long way round (or fail the puzzle) and the door comes six hours later. The beacon stays dark until a re-tune lights it (Folios and re-tuning).
5 · The door
At the door, Turn the rings: a ring-lock, three bench puzzles chained into one (inscribe the rune, align the spheres, then bring the light through). If a ring slips, the door listens again in 12 hours. Make camp; try in the morning brings it back in six. Patronage can hurry a waiting door.
When the rings turn, the obelisk wakes. It pays renown and insight in its two planes, and gives the whole crag a gift that lasts. The next sister can be heard from the start of the following week, so waking one early in a week doesn't bring the next any sooner. The Shield panel lists all seven sisters and their territories, and names each one's gift once it wakes.
Show every sister's gift
| Sister | Where | Its gift |
|---|---|---|
| The Mox obelisk | The Land of Prosperity | Prosperity's builders answer: one more crew. |
| The ice obelisk | The Pristine Northwest | The ice ward: chaos comes a step more rarely. |
| The Drybone obelisk | The Wild Northeast | The badlands ring: one more probe every night. |
| The rainforest obelisk | The Great Lowlands | The valley's green light: shards are worth a sixth more. |
| The bog obelisk | The Shimmering Coasts | The coasts shimmer brighter: Praetoria pays a sixth more for contracts. |
| The deep obelisk | The Deep | Ley under every room: everything makes a tenth more. |
| The Praetorous obelisk | The Central Fire | The Shield closes. The Desolation's fronts break on it. |
Desolation fronts
Once a week, on one night, a Desolation front presses on the crag: shards are worth up to 45% less that night and chaos comes more often. Each sister awake weakens it by a seventh, and each level of the Ward holds off another 12%. When the Shield is whole the fronts break on it and stop. Until then the Shield panel warns you of the next front a night ahead.
Patronage, plaques and titles
Patronage is the renown you've earned since the story ended, less what you've spent of it. Spend it on the Shield panel's Patronage tab. Plaques go up on Vinnie's sign, where visitors see them.
| Favour | Patronage | What it does |
|---|---|---|
| Sponsor the next expedition | ★ 120, each time | A faction pays for wagons and guides: the next journey is three tenths shorter. |
| Hurry the door | ★ 80, each time | After a night's camp or a slipped ring, the door takes its time. A patron's runesmith can make it ready now. |
| Back a second neighbour | ★ 300 | Your patrons vouch for the Folly: there's room on the crag for another neighbour's mark, and their story. |
| A plaque: EST. ON A ROCK, BY FINK | ★ 200 | Fink insists on the full stop. |
| A plaque: WATCHED BY THE RIFTWATCHERS | ★ 300 | Oshuur sends it up with a cadre, who screws it on crooked. |
| A plaque: BY APPOINTMENT TO FOLA COMMAND | ★ 400 | Screwed to Vinnie's sign, under protest. |
| A plaque: EVERY PLANE, BY APPOINTMENT | ★ 600 | Every plane's glyph, in brass. For when the Shield is whole and Fink is insufferable. Once the Shield is whole. |
Your title changes too. Once the first sister wakes, it's a Keeper's title, one for each light: Keeper of Two Lights, Keeper of Three Lights, Keeper of Four Lights, Keeper of Five Lights, Keeper of Six Lights, Keeper of Seven Lights, Keeper of the Shield.
The purse after the story
After the story the crag is built to be played once a day as well as three times. A few rules change so that a daily visit loses little, and so the purse doesn't run away from the keystones.
The keystone's set-aside
From the moment the Shield opens until the current keystone is forging, Fink keeps its whole price aside. Building, upgrading, digging, rushes and contracts can't dip into it: the build menu and the room panel show costs against what's left, and say so when something would dip in. The forge itself uses the whole purse, and so does an offer at the door, since you see the price when you choose. Once the keystone is forging, the set-aside lifts until the next obelisk.
What changes
- Stores hold a day. Every room's store holds 24 hours of output, up from 8 (the Lightning Spire's already held three times that).
- Benches batch. The Glassworks, Workshop, Ward and Orrery benches collect a day's orders, and one puzzle works every order waiting, each at 85% of its usual pay when there are several. The Rune Foundry is left as it was, since its orders pay probes.
- Errands come by the night. The neighbours call 9 times a night; calls you don't take carry over one night. A slot refills three minutes after you finish or skip an errand, while calls last.
- Contracts by the night. A contract you deliver is replaced after midnight, so the Mast's slots are so many contracts a night.
- The door keeps callers. Visitors who came while you were out wait for you, as many a night as the door holds. A kept caller is never chaos and never one who pays probes. A holiday or the season's herald takes the night's first call.
See Workbench puzzles, Errands, Contracts and standing and Events and the door for how each works before the story ends.
The Gobson Counting House
The Gobson Counting House opens after the story. It changes aether into brass at 4 for 1 or glass at 5 for 1, one way only, up to an allowance a night. Curios on its shelf raise the allowance. It pays through the set-aside like any other spending.
| Level | Brass and glass a night | Cost |
|---|---|---|
| 1 | 1,000 | 600 aether · 150 brass |
| 2 | 2,500 | 1,800 aether · 450 brass · 200 glass |
| 3 | 5,000 | 4,200 aether · 1,000 brass · 600 glass |
Omens
Every night after the story has an omen, the same for every crag. The Agenda and the Board show tonight's, and an Orrery at level 2 also reads tomorrow's in its panel. Each nudges one thing for that night only, at the moment you do it, so there's nothing to save up. Omens never touch probes, the mote, relics, renown or insight.
| Omen | What it does |
|---|---|
| Brass Wind | The Workshop's orders pay half as much again. |
| Clear Glass | The Glassworks' orders pay half as much again. |
| Still Air | Builds, upgrades and digs started tonight take a quarter less time. |
| Lantern Night | Visitors and sellers come to the door more often. |
| Quiet Rifts | Chaos comes half as often. |
| Gossip | Errands pay a quarter more in materials. |
| Signal Night | Contracts pay a quarter more in materials. |
| Market Night | Picket's cart has one more thing on it. |
The Heights and above the clouds
The crag stops at storey 6, but the sky doesn't. Bram's Hoist takes the observatory up through three more bands, each six storeys tall and two columns narrower than the one below, to storey 24.
Bram's Hoist
Bram brings the Hoist's plans once the Great Lens reaches level 5 and chapter 6 has opened, so the Hoist, storeys and the Heights can go up before the story ends. The higher bands, the neighbours' show rooms and the high rooms wait for after it. The Hoist is a one-cell room on the Crag, and each of its levels reaches one band higher.
| Level | Reaches | Waits for | Cost | Builds in |
|---|---|---|---|---|
| 1 | The Heights | Chapter 6 and the Great Lens at level 5 | 10,000 aether · 3,000 brass · 2,000 glass | 4 h |
| 2 | The Cloud Line | Two sister obelisks awake | 40,000 aether · 12,000 brass · 8,000 glass | 24 h |
| 3 | The Starward Spire | The Shield whole | 120,000 aether · 36,000 brass · 24,000 glass | 48 h |
Building above the Crag
- The footing. A band opens only over a full floor: the storey under it finished across all the band's columns.
- No building on scaffolding. Up there every room stands on finished rooms, so a column rises one storey at a time.
- Inside the band. A room stays within its band's columns and can't straddle two bands.
- The Spire is one column. A sky room there can only crown storey 24.
Storeys
The Storey is the filler that gets you up there. It starts as an iron truss, and its upgrade refaces it in stone. Bram's steeplejacks build it, so it never holds one of your crews, and chaos never strikes it. A storey costs three times as much, and takes three times as long, for each band up:
| Band | A truss (or its stone) | Builds in |
|---|---|---|
| The Crag | 1,500 aether · 450 brass · 300 glass | 20 min |
| The Heights | 4,500 aether · 1,350 brass · 900 glass | 1 h |
| The Cloud Line | 13,500 aether · 4,050 brass · 2,700 glass | 3 h |
| The Starward Spire | 40,500 aether · 12,150 brass · 8,100 glass | 9 h |
- Raise a floor. At the end of the build menu's list, Raise a floor puts a truss on every cell of the lowest storey that has room for one, at that band's price, in one go.
- Take it down. A storey with nothing on it can come down from its panel, to clear a column for a sky room. Nothing comes back, so it asks twice.
- Swap it with…. Two rooms of the same size can trade places, a minute each, while the rooms on top stay put. A storey stays in its own band. To put a room where others stand, see Swapping and the store.
Carvings
A stone storey's medallion can be carved, for 12 seals each time: a rose window, a gargoyle's head, a sundial, a crescent and star, fink's monogram, a bell in relief, a great gear, an owl. Chisel it off is free. Each carving adds 3 to Grandeur and shows on visits. It's the seal sink that keeps going once Picket's cart is bought out (Picket's cart and dressing the crag).
High rooms
Three rooms only go up high, after the story. Bram's steeplejacks build them (no crew held), each has one level, and you can build one of each.
| Room | Where | Cost | What it does |
|---|---|---|---|
| Aerie Landing | 2 wide, from storey 13 | 30,000 aether · 9,000 brass · 6,000 glass, 8 h | Airships and wings moor here: one flight a night from Praetoria's far corners, visitors who only come this high. |
| Carillon | a sky crown, from storey 7 | 25,000 aether · 8,000 brass · 3,000 glass, 6 h | Rings in the Cloud Line's and the Spire's toppings-out. The crown of a skyline, for Grandeur. |
| Starward Eye | a sky crown on top of the Spire, storey 24 | 60,000 aether · 15,000 brass · 15,000 glass, 12 h | One constellation a night to chart on a sky plate, 24 in all, each a page in the journal. |
- Flights at the Landing. At most one flight a night moors at the Aerie Landing, in a slot of its own, so it never keeps a caller from the door, and none comes while the last is still moored. There are 12: 4 from anywhere, and the rest from the regions of sisters 4 to 7 once each is awake. New ones come first; after that a flight comes again only three weeks after its last visit. Each goes in the Journal's The Landing's log.
- The Starward Eye. Once it crowns the Spire, Fink charts one constellation a night on a sky plate, 24 in all, in the Journal's The stars. Like the moon's sketch it pays nothing (The nightly sketch); all of them put EVERY STAR CHARTED on the sign.
Topping out
When something stands finished on a band's top storey, and every one of its columns is finished up there or crowned lower down by a sky room, the band is topped out. After the story, Bram's crew comes with a scene, once for each band, and it pays seals. The Carillon rings the higher two in. Topping out the Spire puts A STOREY FOR EVERY HOUR on the sign.
A tall crag is a long way to scroll. The ⤢ button frames the whole skyline, the altimeter on the right shows where you are, and PageUp PageDown Home End climb the crag.
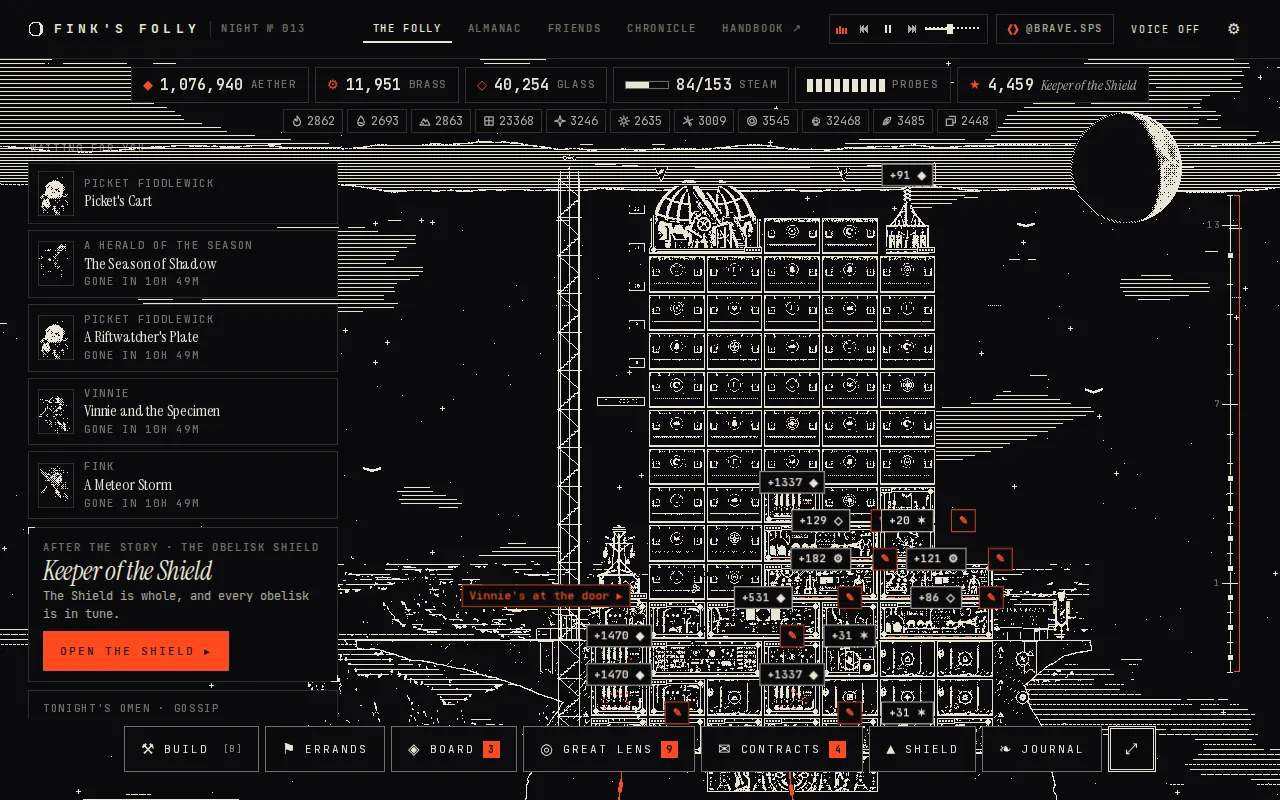
Room fittings
After the story, a few rooms at the top of their ladder take a fitting: one of two trade-offs, more of one thing for less of another. It lets a finished crag suit how you play: its ley lines, its storms, whether you'd rather solve or collect.
| Room | One fitting | Or the other |
|---|---|---|
| Glassworks level 5 | Annealing oven. Makes 15% more, but its bench orders pay a twentieth less. | Polishing wheel. Its bench orders pay a twentieth more, but it makes a tenth less. |
| Tinker's Workshop level 5 | Annealing oven. Makes 15% more, but its bench orders pay a twentieth less. | Polishing wheel. Its bench orders pay a twentieth more, but it makes a tenth less. |
| Aether Condenser level 5 | Storm coil. Makes 60% more in a storm hour, a twentieth less in clear weather. | Ley tap. A twentieth more on a ley line, a tenth less off one. |
| Guest Room level 5 | Parlour. Visitors call more often, sellers less (never the callers who bring probes). | Trading table. Sellers call more often, visitors less (never the callers who bring probes). |
| Signal Mast level 5 | Signal flags. Contracts wait a day and a half before they lapse. | Brass speaking-tube. Contracts pay a tenth more in goods, but lapse after 18 hours. |
- Requirements: the story told, the room at its top level and the Great Lens at level 5.
- Fitting it: in the room's panel, under Fitting, choose Fit it. The refit takes 4 hours with the room out of action. It holds no crew, can't be hurried, and the room has no fitting until the new one is in.
- Changing your mind is another 4-hour refit.
Fittings never touch probes, shards, renown, insight or the story's pace. A Guest Room's fitting changes visitors and sellers, never the callers who bring probes.
Grandeur
Grandeur is how fine the Folly looks from New Gobson, a score out of 1000. It's worked out only from what anyone can see, so a visitor gets the same number you do. It pays nothing: no resources, no renown. It counts from the start, but most of it waits for the Heights and the Shield. Your score and its parts are on the Board's Dress the crag tab (Picket's cart and dressing the crag).
| Part | Up to | What counts |
|---|---|---|
| height | 300 | 12.5 for each storey of your tallest column, so the top of it waits for the Heights. |
| ornament | 250 | The charm of every ornament on show, each show room you've built, and 3 for each carved storey. |
| breadth | 150 | 10 for each kind of working room on the crag, up to 15 kinds. |
| craft | 150 | 5 for each working room at the top of its ladder, up to 30 of them. |
| skyline | 100 | Up to half for a skyline that mirrors itself left to right, and the other half for one clear peak in the middle three columns, standing at least three storeys above both outer columns. |
| shield | 50 | 7 for each sister obelisk awake, and 1 more when all seven are. |
Each tier puts its plaque on the sign:
| Grandeur | Plaque |
|---|---|
| 150 | A Sight Worth the Climb |
| 300 | A Landmark of the Broken Lands |
| 450 | The Talk of New Gobson |
| 600 | A Wonder of Praetoria |
| 850 | Fink's Folly, Perfected |
- The grandest observatories. The Chronicle has a board of the highest Grandeur. Only open crags are on it: if you've closed yours to visitors in Settings, it's left out (Visiting other crags).
- Paying never moves it. Commissioned rooms and the Exchange's pieces add nothing to Grandeur (Commissioned rooms, The Exchange's stall).
- Beacons count. Each lit beacon on the rim adds 5 to the ornament part.
Folios and re-tuning
Almanac folios
Once the Shield is whole, the insight the keystones used to take piles up. Fink binds it into folios: three for each of the 11 planes, costing 100, then 250, then 500 of that plane's insight. Bind them on the Journal's Folios tab.
- Each folio is a page in the Journal about its plane.
- The plane's glyph is cut into the crag, deeper with each folio: on the next undug cell of the rock face, then on the wall of an empty cave, then down the crag's right flank. Visitors see the carvings.
- Nothing else reads folios: no goal, probe, shard or rate.
Re-tuning
After the Shield is whole, one obelisk drifts out of tune each week, starting the week after it closes. While it drifts its gift pauses. The Shield panel names it; Re-tune it ▸ deals that obelisk's own site puzzle at difficulty 7. Solving it puts the gift back for the rest of the week and pays a little renown and aether. An unfinished re-tune lapses when the week ends, since another obelisk drifts then.
Beacons
Each sister has a beacon on the crag's rim, lit the night its site was solved. A beacon left dark because Fink went the long way round lights when you re-tune that obelisk.
Every night
Midnight, the Notice Board and seals, Picket's cart, the Conundrum and visits.
What happens at midnight
The Folly keeps time in nights. A night runs from midnight to midnight UTC, so it's the same night for every observer wherever they live: midnight UTC is early evening in New York and the morning in Tokyo. Night № 1 began on 3 October 2026, and the number of tonight's night is at the top of the screen.
Nothing on the crag stops at midnight. Rooms fill their stores as the hours pass, builds and digs keep their own clocks, and work orders come back to the benches over time. What midnight does is turn the page: some things are topped up, some are dealt anew, and a few that were left undone are gone.
Topped up
- The probe rack fills to what your Rune Foundry holds (one more with the Great Lens beside the Orrery, and one more once a certain sister obelisk wakes). The Foundry also casts probes through the day; midnight only tops the rack up, it never takes any away. See Probes and shards.
- After the story, 3 pings of the map of Praetoria a night (The Obelisk Shield), and 9 errand calls. Calls you didn't take carry over for one night, so the most you can have waiting is 18.
- After the story, the door also keeps the callers who came while you were out, as many a night as it has room for. They're never chaos.
Dealt anew
- The moon: a new field of shards and a new mote, the same for everyone (Probes and shards, The Great Lens and the mote hunt). Last night's mote can no longer be found, and its relic goes with it (Relics).
- The Daily Conundrum (The Conundrum and the Weekly Survey). Last night's, if you never solved it, is gone.
- The Notice Board's three jobs, one of them the same for everyone (The Notice Board and seals), and Picket's stock (Picket's cart and dressing the crag).
- Vinnie's parcel, once you have a Guest Room. It waits at the door for 44 hours, and the next one comes only when this one is opened or gone.
- The Council's crate, if you hold staked SPS: a share of the night just ended (The Council standard).
- After the story: a new omen (below), contracts you delivered are replaced (before the story they're replaced at once), and with the Aerie Landing built, a flight comes in if none is moored there already.
- Tonight's sketch of the moon, and with the Starward Eye tonight's constellation (The nightly sketch).
Each new week
Every seventh night begins a new week (the week turns at midnight UTC going into a Friday). The Weekly Survey is new, and an unsolved one is gone; the Exchange's stall puts out its next two pieces (The Exchange's stall); and after the finale another obelisk drifts out of tune (Folios and re-tuning).
The stores while you sleep
A room's store holds 8 hours of work during the story (the Lightning Spire's three times that). After the story every store holds 24 hours, so checking in once a day loses nothing. When you come back, the While you were away card says what finished, what's waiting and what the stores hold, and Collect it all brings the stores in.
Omens
Once the story is told, each night has an omen, the same for every crag. It nudges one thing the crag does tonight, at the moment you do it, so there's nothing to save up for. The Agenda and the Board show tonight's; the Orrery shows it too, and from level 2 it reads tomorrow's as well. Omens never touch probes, the mote, relics, the Conundrum, the Weekly Survey, renown or insight.
| Omen | What it does tonight |
|---|---|
| Brass Wind | The Workshop's orders pay half as much again. |
| Clear Glass | The Glassworks' orders pay half as much again. |
| Still Air | Builds, upgrades and digs started tonight take a quarter less time. |
| Lantern Night | Visitors and sellers come to the door more often. |
| Quiet Rifts | Chaos comes half as often. |
| Gossip | Errands pay a quarter more in materials. |
| Signal Night | Contracts pay a quarter more in materials. |
| Market Night | Picket's cart has one more thing on it. |
The Notice Board and seals
The Notice Board goes up when Vinnie arrives (chapter 2). Open it with Board on the dock; a number on the button says how many jobs are still open. Each night it posts three jobs, met by things the crag does anyway: firing probes, working orders, answering errands, emptying stores.
- The first job is the same for everyone that night, marked "everyone's tonight". The other two are your own.
- A job counts what you do from the moment it's posted. Each one done pays 1 seal, and finishing a night's three pays 2 more: 5 seals a night at most, however often you visit.
- A job keeps 3 nights (the night it was posted and the two after). Come back after a night or two away and the board deals the nights you missed that are still in date, so a short absence costs nothing.
The jobs the board can post (the ones marked can be everyone's; the rest appear once the crag can do them):
| Job | Everyone's? |
|---|---|
| Fire three probes at the moon | can be |
| Bring in six shards | can be |
| Solve three puzzles, any kind | can be |
| Empty the stores | can be |
| Fine work: one puzzle solved tidy or fast | can be |
| Answer two of the neighbours' errands | can be |
| Work two Glassworks orders | |
| Work two Workshop orders | |
| Inscribe a rune at the Foundry | |
| Align the Orrery's spheres | |
| Trace a ward in the Ward Chamber | |
| Sketch tonight's feature of the moon | |
| Deliver a contract | |
| Ping the map of Praetoria | |
| Answer three errands | |
| Fire five probes |
Seals
Seals are the board's currency, and they buy looks only: ornaments and show-room blueprints at Picket's cart. They never buy materials, probes, insight, renown or rushes, and nothing that paces the story reads them. The Board's header shows how many you hold.
The stamp card
A night earns a stamp when you fire a probe that night or finish one of its jobs. A job carried over and finished later still stamps the night it was posted, up to 2 nights back, so a missed night can be made good. The card never resets. The Board's Stamps tab shows the last seven nights, your total and the next milestone.
- Milestones pay seals: 3 stamps pay 5, 7 stamps pay 10, 14 stamps pay 15, 21 stamps pay 20, 28 stamps pay 30, then 20 more every 14 stamps after 28.
- Each season has a card of its own: 20 stamps in one lunation earn that plane's pennant for the crag's bunting (Seasons and the Planar Almanac).
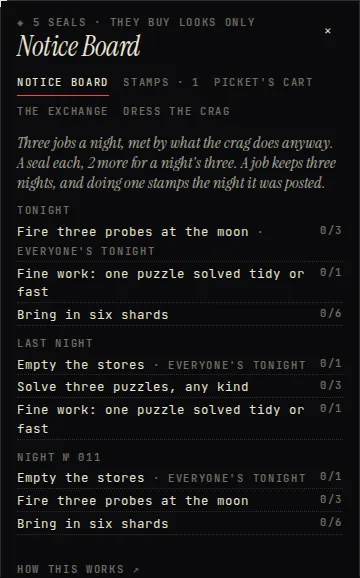
Picket's cart and dressing the crag
From chapter 2, Picket Fiddlewick parks his cart on the rock spur past the door. Once you've answered his first visit, the cart stands there for good: tap it, or open the Board's Picket's cart tab.
- Each night he has two ornaments and two blueprints, the same stock for everyone. On a Market Night (an omen, after the story) there's one ornament more. New stock comes after midnight.
- He takes seals only. A row you can't afford yet says how many seals you're short.
- Blueprints are for show rooms. Until the story is told he keeps them "under the tarp": named, but not for sale. After it, a blueprint costs 30 seals, plus 5 for each one you've already bought.
His ornaments, each for its own spot:
| Ornament | Spot | Seals |
|---|---|---|
| A flagstaff | Atop the stairwell | 15 |
| Fink's old telescope | Atop the stairwell | 20 |
| A lightning rod | Atop the stairwell | 15 |
| A lantern on a pole | By the door | 10 |
| Vinnie's post box | By the door | 12 |
| A holiday wreath | By the door | 12 |
| A bench for the view | On the sill by the sign | 10 |
| A goblin's herb box | On the sill by the sign | 12 |
| A brass armillary | On the sill by the sign | 20 |
Show rooms
A show room makes nothing and uses nothing: it's there to be looked at. Once you hold its blueprint it appears in the build menu. Hired crews put it up for the materials below, so none of your own crews is held, and it has a single level. It's never struck by chaos and has no curio shelf. Packing it away keeps the blueprint in the store for a free rebuild (Swapping and the store).
| Show room | Cells | Stands | Built for | Takes |
|---|---|---|---|---|
| Belvedere | 2 | on the ledge or higher | 30,000 aether, 8,000 brass, 5,000 glass | 2 h |
| Clock Face | 1 | on the ledge or higher | 14,000 aether, 5,000 brass, 1,000 glass | 1.5 h |
| Moonflower Terrace | 1 | on the ledge or higher | 10,000 aether, 3,000 glass | 1 h |
| Stair Turret | 1 | on the ledge or higher | 8,000 aether, 2,500 brass | 1 h |
| Cupola | 1 | under open sky | 18,000 aether, 4,000 brass, 3,000 glass | 1.5 h |
| Gargoyle Roost | 1 | under open sky | 22,000 aether, 6,000 brass | 2 h |
After the story, the neighbour you back gives you a show room of their own for the Heights; Picket never sells those (Backing a neighbour).
Dressing the crag
Every ornament hangs at a fixed spot, and each spot shows only so many at once, so a crag can be dressed but never cluttered. Some ornaments come with the crag's story: the mark of the neighbour you back, a faction's banner while your standing with them holds, a beacon for each obelisk's site you light, a flag once a room stands on storey 6, the top of the Crag, and the Council's standard. The rest you earn (season pennants) or buy (the cart, the Exchange).
The Board's Dress the crag tab lists each spot with the ornaments you own for it. Tap one to show it or take it down. A spot you never dress shows the first ornaments you own for it. Ornaments pay nothing, but most count toward Grandeur, shown at the top of the same tab (Grandeur), and visitors see exactly what you show.
| Spot | Shows at once |
|---|---|
| Atop the stairwell | 1 |
| By the door | 1 |
| On the sill by the sign | 1 |
| The crag's flanks | 2 |
| Bunting | 11 |
| Along the rim | 7 |
| On the summit | 1 |
| On the crag's prow | 1 |
| On Picket's cart | 1 |
| On the Exchange's stall | 1 |
| Set into the rock | 2 |
| Under the overhang | 2 |
| The Council's standard | 1 |
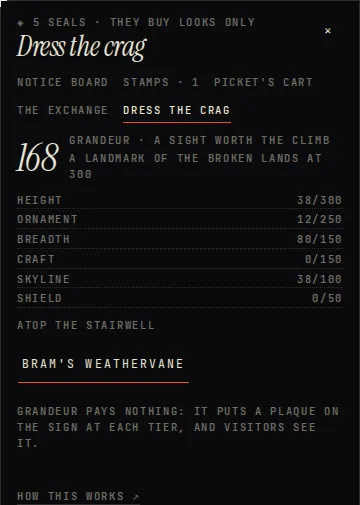
The Conundrum and the Weekly Survey
Fink's Daily Conundrum lives in the Study's panel. It's one puzzle a night, the same for every observer, and it's marked Hard from the very first night. The kind turns over night by night: grind and align, mesh the gears, inscribe the rune, align the spheres, then round again.
- The clock starts the moment it's handed to you, so open it when you have a few quiet minutes. Solving it pays aether, brass, glass and a little renown, more as your Study grows.
- You can solve it once a night. An unsolved one is gone at midnight, and the next night's is a different puzzle.
- The Study shows tonight's fastest; the Chronicle keeps the boards (/chronicle).
The Weekly Survey
From chapter 4, Signals, the Study also holds the Weekly Survey: a ring-lock of three rings, the same for everyone all week. Each ring is a bench puzzle and they come in order: inscribe the rune, align the spheres, then grind and align. It's timed the same way, pays several times what the Conundrum does, and can be done once a week. The panel counts down to the next one; an unsolved Survey is gone when the week turns.
Visiting other crags
Every observatory can be visited: a read-only look at someone else's crag, with its own address. Yours is /o/@yourname, your Hive account (crags played before sign-in was needed have a callsign and a short code instead). The Chronicle links names to their crags, and Settings shows your own address with a Copy link button.
A visitor sees the outside of the Folly, as you've dressed it:
- the rooms where they stand, the rock you've dug, carvings, the sign with its plaques, and the ornaments you show;
- a stud for each curio on a shelf (how many, never which);
- the Obelisk Shield as far as it's woken, and the Council's standard if you fly one (never the stake behind it);
- a few totals: Grandeur, renown, relics and Gold Foils, the longest vigil, the curio cabinet, and how many Conundrums and Surveys you've solved.
They never see your purse, your puzzles, who's at your door or tonight's hunt. On a visit the mouse wheel scrolls the page (hold Ctrl or ⌘ to zoom), and a tall crag has ▲ and ▼ to climb it. Want to see one first? /look is a sample crag a few weeks on.
Closing your crag
Open Settings (⚙, top right) and under Visitors turn off Let others look round. Your address then says "Closed to visitors", and the Chronicle stops linking to it. Turn it back on whenever you like.
Friends of the Folly
Splinterlands cards who come up the hill, and the keepsakes they leave.
Meeting friends
Many of the people who come up the hill are real Splinterlands cards: the Goblin Chef with his stewpot, the Riverboat Captain, the Supply Runner and 32 more. Fink calls them acquaintances; Vinnie calls them the Friends of the Folly, and keeps a guest book of them.
Meeting them
You meet a friend simply by playing. They call at the door as visitors, bring errands to the board, or speak in a scene. The moment one of their lines reaches you, or their errand is dealt, they count as met. There's nothing to chase: keep answering the door and working errands (Events and the door, Errands), and the guest book fills.
Once a friend has called and Fink has seen your collection (from chapter 2), Vinnie brings round The Guest Book. It opens the friends' own page, beside the Almanac: /friends.
The Friends page
The page shows every friend as an engraved portrait, drawn from their card's art. Portraits and Card art switch between the engraving and the card itself. Tap a friend for their card's edition, rarity and splinter, Fink's note on them, the keepsake they'd bring, and what to do next. Each tile's colour says where you stand with them: on the wall, has called, card at its top level, in your collection, or not held.
There are 35 friends: 9 common, 11 rare, 7 epic, 8 legendary.
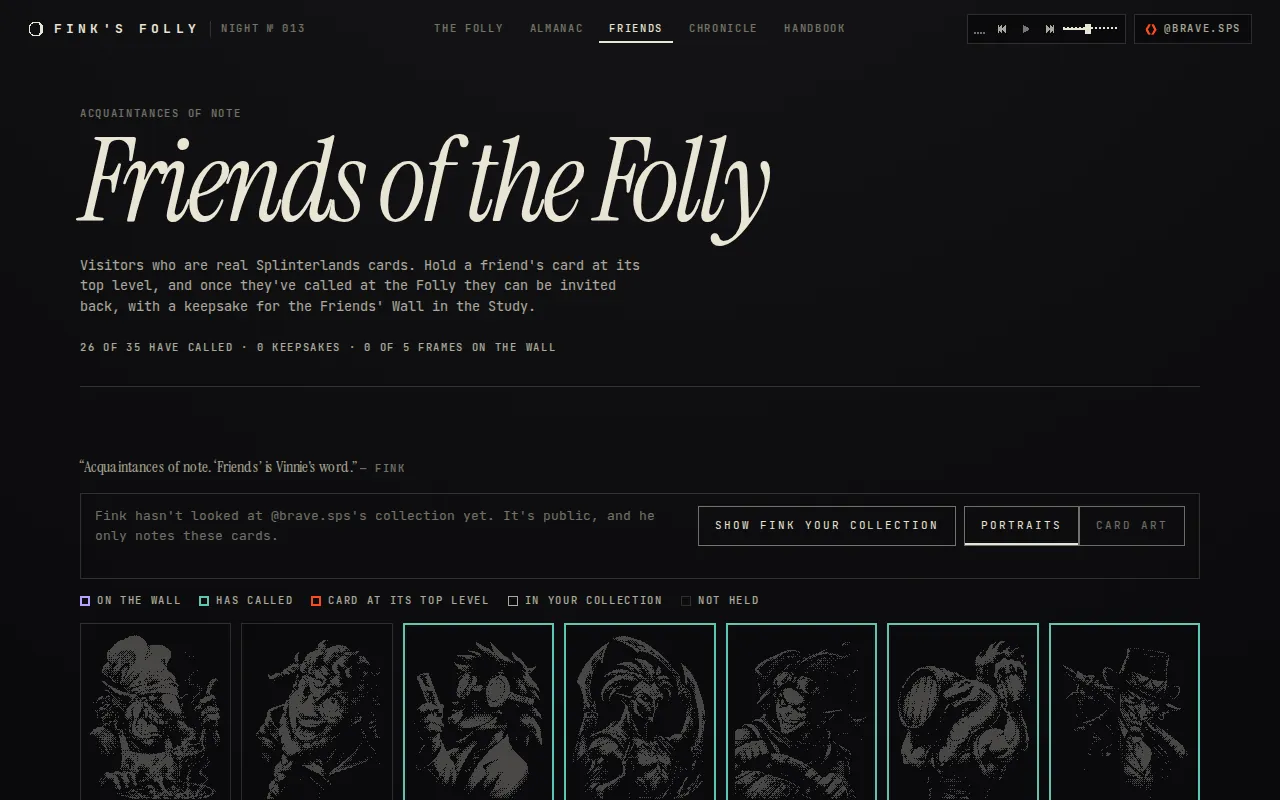
Inviting them, and keepsakes
A friend you've met can be invited back once you own their card at its top level. That level depends on the card's rarity:
| Rarity | Top level | Friends |
|---|---|---|
| Common | 10 | 9 |
| Rare | 8 | 11 |
| Epic | 6 | 7 |
| Legendary | 4 | 8 |
- Gold foil or regular doesn't matter: a card of either at its top level counts.
- The card must be your own. Cards rented or delegated to you don't count.
- Fink reads your collection from Splinterlands' public data and notes only these cards. He reads it again in the background when you open the game and his last look is 12 hours old. To have him look now, press Show Fink your collection (later Look again) on the Friends page; a big collection can take a minute.
Inviting a friend
- On the Friends page, open a friend you've met whose card you hold at its top level, and press Invite ▸. The game opens with their scene at the door.
- They ask for one thing: a puzzle of one of the kinds the benches and errands use (Workbench puzzles, Errand puzzles), or for a few, a ring-lock. It's a step harder than their errands. It's untimed, so you can close it and come back, and choosing it again reopens it free.
- Solve it and they leave their keepsake. If it goes wrong, or you send them away for now, nothing is lost: invite them again whenever you like. Their scene waits at the door until you answer, and it never keeps another caller away.
The Friends' Wall
Keepsakes hang on the Friends' Wall in the Study. Select the Study (the Friends page's To the Study ▸ takes you there) and frame or unframe them in its panel. The wall has 3 frames, a fourth at Study level 4 and a fifth at level 6. A small frame appears on the Study for each keepsake hung.
A framed keepsake gives one small, lasting effect, and it works only while you still hold its card at its top level. If the card drops below it (sold, or no longer yours), the keepsake goes quiet: it stays on the wall, does nothing, and works again as soon as Fink sees the card back at its top level. Keepsakes waiting for a frame do nothing; swap them in and out as you like.
Every friend and keepsake (35)
| Friend | Card | Challenge | Keepsake | On the wall |
|---|---|---|---|---|
| Goblin Chef | Common, level 10 | Recreate the stew | The Chef's Ladle | Recreating the Chef's stew pays 30% more |
| Supply Runner | Common, level 10 | Load the riverboat | A Runner's Satchel | Stores hold an hour more (the Spire three; three on a day's store after the story) |
| Scavo Chemist | Common, level 10 | Grind and align | A Corked Purple Vial | Aether Condensers make 10% more |
| Palimpsest Prophet | Common, level 10 | Re-shelve the Codex | A Scraped Vellum | Once a night, a dropped contract is replaced at once |
| Mad Gearhead | Common, level 10 | Mesh the gears | Velza's Spare Wheel | Every errand pays 15% more (never more renown) |
| Brewmaster Abraxas | Common, level 10 | Recreate the stew | A Coiled Chalice Tankard | Vinnie's nightly parcel is a quarter bigger |
| Gobalano Soldier | Common, level 10 | Load the riverboat | A Tax Receipt, Paid in Full | Repairs after chaos take half as long |
| Mar Toren Trader | Common, level 10 | Re-shelve the Codex | A Merfolk Pearl | Traders and sellers call more often |
| Time Meddler | Common, level 10 | Align the spheres | A Borrowed Minute | Rushing a job costs 15% less |
| Riverboat Captain | Rare, level 8 | Load the riverboat | The Captain's Feathered Hat | Loading the riverboat pays 30% more |
| Razi Clanktrap | Rare, level 8 | Grind and align | Razi's Tunnel Lantern | Digs turn up half as much again |
| Canary Keeper | Rare, level 8 | Inscribe the rune | A Canary (Alive, Indignant) | The first chaos of each night misses |
| Arcane Curator | Rare, level 8 | Re-shelve the Codex | A Conclave Catalogue Card | Containment Cells give 10% more insight |
| Gobson Sniper | Rare, level 8 | Grind and align | A Family Scope | Imps and riftwings can be seen off with a shot, free |
| Rune Arcanist | Rare, level 8 | Inscribe the rune | A Waystone Chip | Boilers make 10% more steam |
| Underboss Fabino | Rare, level 8 | Mesh the gears | Fabino's Calling Card | The Study makes 10% more aether |
| Kelan Gaines | Rare, level 8 | Re-shelve the Codex | A Mothrook Waybill | New contracts give a day longer |
| Dragon Egg Forager | Rare, level 8 | Load the riverboat | A Forager's Climbing Hook | Lightning Spires make 15% more aether |
| Scavo Technomancer | Rare, level 8 | Turn the rings | A Technomancer's Tuning Fork | Obelisk pings also say which quarter it lies in |
| Dark Astronomer | Rare, level 8 | Plot the sky plate | A Dark Star Lens Cap | Shards of Chaos, Darkness and Death are worth 15% more |
| Prismologist | Epic, level 6 | Grind and align | A Battle Prism | Glassworks make 10% more glass |
| Clockwork Aide | Epic, level 6 | Mesh the gears | The Aide's Winding Key | Work orders come back 15% faster (not the Foundry's) |
| Ferrous Brewer | Epic, level 6 | Recreate the stew | A Stone Tankard | Building, upgrading and digging are 8% quicker |
| Lucky Longshot | Epic, level 6 | Grind and align | Lucky's Pie Tin | Chaos comes 20% less often |
| Vextali | Epic, level 6 | Re-shelve the Codex | Vextali's Seal | Insight from every source +8% |
| Lunaki Howler | Epic, level 6 | Align the spheres | A Howler's Moon-Tooth | Shards are worth 8% more |
| Halfling Alchemist | Epic, level 6 | Inscribe the rune | Half a Spoon | Digs take a third less time |
| Oshuur Constantia | Legendary, level 4 | Turn the rings | Oshuur's Monocular | Desolation fronts press a quarter less |
| Lux Vega | Legendary, level 4 | Clear the switchback | A Stagecoach Ticket | Expeditions are 10% shorter |
| Astral Entity | Legendary, level 4 | Align the spheres | A Scrap of Starless Night | The Orrery makes 15% more insight |
| Possibilus the Wise | Legendary, level 4 | Inscribe the rune | A Psionic Bookmark | The obelisks' door ring-locks are a step easier |
| Archmage Yabanius | Legendary, level 4 | Turn the rings | The Architect's Square | Keystones cost 10% less aether, brass and glass |
| Tilly Gearspring | Legendary, level 4 | Mesh the gears | Tilly's Ballast Bag | Workshops make 10% more brass |
| Fizbo the Fabulous | Legendary, level 4 | Grind and align | Fizbo's Encore Card | Visitors and offers wait half as long again |
| Baron Fyatt | Legendary, level 4 | Inscribe the rune | The Baron's Abacus (Confiscated) | Contracts pay 10% more aether, brass and glass |
Supporting the Folly
Paying in DEC, the benefactors' plaques, the Exchange, commissioned rooms and the Council standard.
How paying works
Fink's Folly is free to play from start to finish. If you'd like to support it, a few things can be paid for in DEC, Splinterlands' own currency: a gift to the Folly, a piece from the Gobson Exchange, or a commissioned room. All of them are looks and thanks. None of them changes the game's pace.
How it works
- You choose what to pay for. The Folly makes out an order with its own price and a memo (an order id starting
ff-), so the payment can only be matched to that order. - Hive Keychain opens and asks you to approve a transfer of DEC to @finksfolly. Read the window before you approve: your account, @finksfolly and the amount. Don't tick "don't ask again".
- The Folly then looks the transaction up on Splinterlands itself. Your browser only reports that something was sent; it never decides that anything was paid.
- When Splinterlands confirms it (the right account, @finksfolly, DEC, at least the price, and the order's memo), the order is credited, once. No transaction can ever be credited twice.
Waiting for an answer
- Splinterlands usually answers in seconds. Until it does, every payment button stays locked, even across a reload or another tab, so you can't pay twice by accident.
- Closing the tab is safe. The Folly also reads the Hive chain for payments to @finksfolly, so a payment whose tab closed before it could report is still found and credited.
- A payment not yet confirmed shows as Waiting and is checked again: within seconds, then minutes, then hourly for two days. If Splinterlands says the transfer didn't happen, it shows Not paid, and nothing moved. Anything odd (two days without an answer, less than the price) shows Being looked at, and a person sorts it out, refunding if need be.
- If a payment may have gone but the page lost track of it, the panel asks you to check your Splinterlands wallet: paste the payment's transaction id if it went, or press I've checked: nothing was sent. A transaction id is public, and it's the only thing you're ever asked to paste.
- Limits: one payment is at most 50,000 DEC, an account can have a dozen payments waiting at once, and make a hundred orders a day.
You need to be signed in with Hive to pay (Signing in). Nothing bought pays aether, brass, glass, insight, renown, seals or probes, or reaches the Conundrum, the Survey or the mote hunt.
Benefactors and plaques
A gift to the Folly is a thank-you and nothing more. Open Settings (⚙) and press Give ▸ under The Folly's benefactors, or tap the crag's sign. Gifts come in 5,000 DEC, 10,000 DEC, 20,000 DEC, 50,000 DEC.
Your gifts add up over time, and the total sets your benefactor's plaque. Plaques never come down.
| Given in all | Title | The plaque |
|---|---|---|
| 5,000 DEC | Benefactor | BENEFACTOR OF THE FOLLY, in bronze |
| 20,000 DEC | Silver Benefactor | BENEFACTOR OF THE FOLLY, in silver |
| 50,000 DEC | Patron of the Folly | PATRON OF THE FOLLY, in gold; a plaque by the door too |
| 100,000 DEC | Grand Patron | GRAND PATRON OF THE FOLLY, in gold; a lit stone bearing your name too |
- The plaque's crest stands on the sign's board. From the third tier it's cast in gold, and a second plaque hangs on the stairwell by the door. The fourth tier adds a lit stone with your name on it. Visitors see all of it.
- The first time you reach a tier, Fink has something to say: the panel closes and that tier's scene plays. The panel's Play its scene and the Journal's With thanks play it again. A gift that doesn't reach a new tier brings a short note of thanks instead.
- Every benefactor is written in the Benefactors' Book, /benefactors: name, title, total and since when.
A gift never pays materials, renown, seals, probes or insight, and adds nothing to Grandeur (Grandeur).
The Exchange's stall
From chapter 2, once Picket's cart stands by the door, the Gobson Exchange sets up its stall beside it. After its first visit, tap the stall or open the Board's The Exchange tab.
- The Exchange has 24 pieces: ornaments of Gobson work, each with its own engraving. 2 a week are on the stall, the same for everyone, and the week turns every seventh night (What happens at midnight).
- The catalogue goes round in 12-week cycles: every piece has its week once a cycle, so none comes back until all the others have had theirs. The tab counts the nights to the next pair.
- Each piece is bought once, for DEC, by its size:
| Size | Price | Pieces |
|---|---|---|
| Small | 500 DEC | 8 |
| Medium | 1,000 DEC | 8 |
| Large | 1,500 DEC | 8 |
Where pieces hang
A piece is an ornament like any other, and each has its spot (on the sill by the sign, by the door, under the overhang, on Picket's cart, atop the stairwell, on the Exchange's stall, set into the rock, the crag's flanks, on the summit, on the crag's prow). It goes up on the crag the moment its payment is credited. If its spot is full, it goes up in place of what that spot showed: the stall warns you first, naming what it would take down, and asks you to press Buy anyway. You can switch back at any time.
- A piece you own has two buttons on the stall: The Folly's ▸ takes the camera to it, and Show or Hide puts it up or takes it down. Pieces off the stall this week are listed below under The Folly's other pieces.
- Pieces add nothing to Grandeur. If one takes the place of an ornament that counted, Grandeur drops by that ornament's share until you show it again.
- Pay promptly: an order holds for two hours. A payment made in time is credited even if it's confirmed later, after the week has turned. One made after that goes to a person to be refunded.
Commissioned rooms
A commissioned room is a show room built to order: Bram's hired crews put it up, and it's yours for good. Open Build and its Commissions page (from chapter 2).
| Room | Price | Where |
|---|---|---|
| The Orangery | 10,000 DEC | Two cells, on the crag |
| The Map Room | 5,000 DEC | One cell, on the crag |
| The Music Room | 5,000 DEC | One cell, on the crag |
| The Spectators' Box | 5,000 DEC | One cell, on a roof |
| The Benefactors' Gallery | 10,000 DEC | Two cells, in the Heights (once Bram's Hoist stands) |
| The Star Ballroom | 10,000 DEC | Two cells, in the Cloud Line (once the Hoist reaches level 2) |
- Once it's paid for, its scene plays and the build menu opens with the room at the top, marked Commissioned. Place it like any room: it's built free, by hired crews, in 30 minutes, and none of your own crews is held.
- It has one level, makes nothing and uses nothing. It wears the masterwork trim from the first day, and after dark it lights up with its own night version. The Benefactors' Gallery hangs your plaque's crest at its heart, if you have one.
- Pack it away and put it up again like any show room (Swapping and the store). Its panel's Hear them again replays its scene.
- It adds nothing to Grandeur and paces nothing. A commission has no time limit, and each room can be commissioned once.
The Council standard
The Council standard is for players who hold staked SPS in Splinterlands. The Praetorian Council flies a standard by your sign, and its courier brings a crate of brass and glass every midnight. Open it from Settings (The Council ▸) or by tapping the standard.
What counts
Your stake is read from Splinterlands' public balances: SPS you've staked, plus SPS delegated to you, less SPS you've delegated out. Each staked SPS counts once, for whoever it works for. Fink reads it when you sign in, again whenever you play and the last read is 12 hours old, and at once when you press Read again in the panel.
| Staked SPS | The standard | Crate, after the story | During it |
|---|---|---|---|
| 10,000 | A small Council pennant | 2% | 1% |
| 100,000 | A banner with the Council's mark | 4% | 2% |
| 250,000 | A fringed banner on a brass pole | 5.5% | 2.8% |
| 1,000,000 | A tasselled standard with a crest | 7% | 3.5% |
| 2,500,000 | Twin standards and a lamp between them | 9% | 4.5% |
| 5,000,000 | A gilded standard, lit by a beam of light at night | 12% and a medal each season | 6% |
The first time you reach a tier, Vinnie has a word to say about it. The standard follows your stake up and down. It holds for 48 hours after the last good read; reads happen while you play, so after two days away it goes quiet until the game reads your stake again.
The courier's crate
- At each midnight the courier brings a share of the night just ended's income: what your rooms' stores, bench orders, errands and contracts paid. Brass and glass count as they are. Aether counts too: half of it as brass (4 aether to one) and half as glass (5 to one), so a crag that makes mostly aether isn't left out.
- The crate comes only if your standard was flying at midnight and your stake was read in the 24 hours before it. Playing during the day usually sees to that; pressing Read again always does.
- It's paid at the lowest tier read since the previous midnight, so moving a stake away before midnight doesn't keep the higher crate.
- During the story the share is half. The panel shows your last crate.
- At the top tier (5,000,000 SPS), after the story, the courier also brings that season's medal once a season: a curio that does nothing but shine (it doesn't count toward the cabinet).
Reference
Keys and gestures, a glossary, and answers to common troubles.
Keys and gestures
Everything in the Folly works with a mouse or a finger, and the commonest things have a key as well. A button with a key shows it in brackets, like [B] on Build; the hints are hidden on touch screens.
The crag
| Key or mouse | What it does |
|---|---|
| B | Opens Build. |
| M | Moves the selected room, when it can move now (as its Move it button). |
| Esc | Backs out of whatever is on top: cancels placing, closes a panel or dialog, then clears the selection. |
| PageUp PageDown | Climbs the crag four storeys up or down. |
| Home End | Goes to the ledge, or to the top of the crag. |
| Tab | Moves between the buttons on screen: first a list of every room (it shows while it has the focus), then the tags over rooms, the panels and the dock. |
| Drag | Pans the crag. |
| Mouse wheel | Zooms in and out. |
| Click a room | Selects it and opens its panel. |
| Click a cell | While placing (a build, a dig or a move), places it at once. |
| Altimeter, ↑ ↓ | Drag the altimeter's rail to climb a tall crag, or focus it and step one storey at a time. |
| ⤢ | Frames the working floors, or once the crag is taller, the whole skyline. |
On a touch screen
| Gesture | What it does |
|---|---|
| Tap a room | Selects it; its panel slides up as a sheet. |
| Drag | Pans the crag. |
| Pinch | Zooms in and out. |
| Tap, then tap again | While placing: the first tap shows the ghost and whether it fits, a second tap on the same cell places it. |
| Swipe over a puzzle | Scrolls the page; the board itself answers taps and drags. |
Swapping a room in where others stand asks twice on the crag, with a mouse too: the first click arms the cell, the second swaps (Swapping and the store).
The Great Lens
| Key or mouse | What it does |
|---|---|
| Drag | Turns the moon. |
| Mouse wheel, pinch | Zooms in and out. |
| Click or tap | Aims at the shard or the mark the Lens has drawn there, or at that spot. Click the same place again to fire. |
| Enter Space | Fires a probe at what you're aiming at. |
| Esc | Closes the Lens. |
Puzzles
| Key | What it does |
|---|---|
| Ctrl/⌘ + Z | Undo (Inscribe the rune, Plot the sky plate, Clear the switchback). |
| Backspace U | Undo: Backspace on Inscribe the rune and Clear the switchback, U on Clear the switchback. |
| Esc | Clears the trace (Inscribe the rune), puts back the lot in hand (Load the riverboat), or lets go of a cart (Clear the switchback). |
| R | Turns the lot in hand (Load the riverboat). |
| 1 2 …, Enter | A shelf's number files the page on that shelf; Enter hands the shelves to Vinnie once every page is filed (Re-shelve the Codex). |
| ← → ↑ ↓ | Slides the chosen cart (Clear the switchback) or moves the cursor (Plot the sky plate); Home and End go to the far ends. |
| Space Enter | Marks a star (Plot the sky plate), picks up or lets go of a cart (Clear the switchback), turns the piece in focus (Grind and align), or places or lifts a gear on the peg in focus (Mesh the gears). |
| X, Delete Backspace | X marks a cell empty; Delete or Backspace clears it (Plot the sky plate). |
Over a puzzle, Esc belongs to the board. Leaving an untimed puzzle just closes it; a timed one can be given up, with a second tap to confirm. On a visit to someone else's crag the wheel scrolls the page; hold Ctrl or ⌘ to zoom.
Glossary
The game's words, A to Z, each with the section that explains it.
| Term | Meaning | See |
|---|---|---|
| Aether | Planar energy, bottled: Fink's currency for nearly everything. Condensers, the Study and the Lightning Spire make it. | Resources |
| Agenda | The panel on the left: the chapter's goals with a hint for each, and everything waiting for you. | Reading the screen |
| Backing a neighbour | In the third chapter you choose to back Bram, Picket or Mags. Their mark hangs on the crag and their own story runs alongside. | Backing a neighbour |
| Benefactor | Someone who has given the Folly a gift in DEC. The total sets the plaque on their sign. | Benefactors and plaques |
| Bench | A room's workbench. Each work order is a puzzle; orders come back over time. | Workbench puzzles |
| Blueprint | What you need to build a show room. Picket sells them for seals after the story. | Picket's cart and dressing the crag |
| Brass | Gears, pipe and plate. The Workshop makes it, and its orders and errands pay it. | Resources |
| Chaos | Trouble that comes to the door. It can knock a room out of action until it's repaired. | Chaos and repairs |
| Chapter | The story comes in six. Each has goals, and the next opens when they're met. | How chapters work |
| Chronicle | The stats page (/chronicle): the night's hunt, the boards, and the fastest Conundrum and Survey times. | The Conundrum and the Weekly Survey |
| Commission | A show room bought in DEC and built free by hired crews. | Commissioned rooms |
| Conundrum | Fink's Daily Conundrum: one hard puzzle a night, the same for everyone, with the fastest times on a board. | The Conundrum and the Weekly Survey |
| Contract | A faction's order for goods, delivered for pay and standing. | Contracts and standing |
| Council standard | A standard by the sign for holding staked SPS, with a crate of brass and glass each midnight. | The Council standard |
| Crews | Fink's builders. Each build, upgrade or dig of his holds one until it's done; hired hands put up show rooms and storeys. | Building, upgrading and moving |
| Curio | A found or earned object that sits on a room's shelf and helps that room. | Curios |
| DEC | Splinterlands' currency, and the only token the Folly takes. | How paying works |
| Dig | Opening a cell of rock so a room can stand in it. | Digging into the rock |
| Door | Where visitors, offers, news and chaos arrive. Each caller waits a while in the Agenda. | Events and the door |
| Echo ring | From the Great Lens's level 2, a probe rings back its distance to the mote: the mote lies on that ring. | The Great Lens and the mote hunt |
| Errand | A neighbour's side job, each one a puzzle, on the Errands board from the second chapter. | Errands |
| Exchange | The Gobson Exchange's stall by the door: two ornaments a week for DEC. | The Exchange's stall |
| Fitting | After the story, a room at the top of its ladder can take one of two trade-offs. | Room fittings |
| Folio | Once the Shield is whole, enough insight in a plane binds a page for the Almanac and cuts its glyph in the rock. | Folios and re-tuning |
| Friend | A visitor who is a real Splinterlands card. Hold their card at its top level and invite them back. | Meeting friends |
| Glass | Lens-grade glass. The Glassworks makes it, and its orders pay it. | Resources |
| Grandeur | A score of how fine the crag looks. It pays nothing; each tier puts a plaque on the sign. | Grandeur |
| Great Lens | The great telescope that replaces the old one: where you fire probes and hunt the mote. | The Great Lens and the mote hunt |
| Heights | The storeys above the crag, in bands: the Heights, the Cloud Line, the Starward Spire. Bram's Hoist opens them a band at a time. | The Heights and above the clouds |
| Insight | What Fink understands of each plane, a shard at a time. | Resources |
| Journal | On the dock: Fink's own pages, the curio cabinet, the moon's sketched pages and more, a tab each. | The nightly sketch |
| Keepsake | What a friend leaves when invited back. Framed on the Study's Friends' Wall, it gives a small effect. | Inviting them, and keepsakes |
| Keystone | Forged for each sister obelisk before the journey to wake it. | The Obelisk Shield |
| Ley | A column where the ley runs up through the crag. Rooms standing on it work harder. | Neighbours and the ley |
| Menagerie | The Journal's pages of every plane's specimen the crag has held. All eleven bring a scene, a plaque and a curio. | Curios |
| Mote | The one hidden point of the Beyond on tonight's moon. Find it for the night's relic. | The Great Lens and the mote hunt |
| Night | The game's day: midnight to midnight UTC, numbered from Night № 1. | What happens at midnight |
| Notice Board | Three jobs a night, met by ordinary play, paid in seals. | The Notice Board and seals |
| Obelisk Shield | After the story: seven sister obelisks to find and wake, one a week. | The Obelisk Shield |
| Omen | After the story, one a night, the same for everyone: it nudges one thing the crag does. | What happens at midnight |
| Ornament | A small thing hung at a fixed spot on the crag. Most count toward Grandeur. | Picket's cart and dressing the crag |
| Par | The number of moves a puzzle expects. Beat it and the bench pays more. | Workbench puzzles |
| Planar Almanac | The collection page (/almanac): every plane's pages, glyphs and what you've found. | Seasons and the Planar Almanac |
| Probe | A rune-cast dart fired at the moon. The Rune Foundry casts them; the rack is topped up every midnight. | Probes and shards |
| Relic | The night's prize for finding the mote. Its rarity depends on how many echoing probes it took. | Relics |
| Renown | What Praetoria thinks of the place. It sets Fink's title. | Resources |
| Ring-lock | Three bench puzzles chained in order: the rune, the spheres, then the light. The obelisks' doors and the Weekly Survey use one. | The Obelisk Shield |
| Rush | Finishing a job now: 2 aether for every minute left (brass will do for a move or a repair), or Vinnie's help once a night with a Guest Room. | Building, upgrading and moving |
| Seal | The Notice Board's currency. Seals buy looks only, at Picket's cart. | The Notice Board and seals |
| Season | Each lunation belongs to one plane. Its shards are worth more, and its herald calls once. | Seasons and the Planar Almanac |
| Set-aside | After the story, the next keystone's cost is kept back from what you can spend until it's forging. | The purse after the story |
| Shard | What the planes shed on the moon each night. Probes bring them in for aether and insight. | Probes and shards |
| Show room | A room that makes nothing and is there to be looked at, built by hired crews. | Picket's cart and dressing the crag |
| Sketch | One feature of the moon a night, drawn as a sky plate puzzle for the Journal. | The nightly sketch |
| Stamp | A mark on the stamp card for any night you fire a probe or finish a job. | The Notice Board and seals |
| Standing | Your record with a faction. Deliveries raise it, and step their rival back. | Contracts and standing |
| Steam | What turns the gears. Boilers make it, and rooms use it as it's made; it can't be saved up. | Steam |
| Vigil | Your run of nights in a row with at least one probe fired. | Relics |
| Visit | A read-only look at someone else's crag, at /o/ and their name. | Visiting other crags |
| Weekly Survey | A ring-lock, the same for everyone all week, in the Study from chapter 4. | The Conundrum and the Weekly Survey |
Questions and troubles
The page reloaded by itself
The Folly was updated. An open tab notices and reloads to the new version, but it waits until no board, dialog, card, panel or the Lens is open, so it never interrupts a puzzle. Nothing is lost: your crag lives on the server.
I'm back at the title screen
Your sign-in lapsed, or you signed out in another tab. A sign-in lasts 30 days and is renewed each time you play. Sign in again with the same Hive account and your crag is exactly where you left it (Signing in).
I paid, and nothing has happened yet
The Folly credits a payment only once Splinterlands confirms it. Until then it shows as Waiting and is checked again on its own, for up to two days; you can close the tab. A payment that needs a person shows as Being looked at (How paying works).
A puzzle didn't hand in
If an answer doesn't arrive (a dropped connection, say), the board offers Hand it in again. A timed puzzle also gets a short grace after its clock runs out.
I don't want visitors
Settings (⚙), Visitors, Let others look round: turn it off (Visiting other crags).
Music, voices and sound
- Settings has a Sound switch for voices and effects together, separate ones for Voices and Effects, and the music's own volume and On/Off. The Voice on / Voice off button at the top is the same Sound switch.
- Browsers don't let a page play music by itself, so it starts on your first click or tap. If you pause it, it stays paused.
- Only one tab plays music at a time, and the music dips while someone speaks.
A keepsake or the Council standard has gone quiet
A keepsake works only while you hold its card at its top level; the standard only while a recent read of your stake holds. Both come back on their own once the game reads your collection or stake again. The Friends page's Look again and the Council's Read again do it at once (Inviting them, and keepsakes, The Council standard).
Playing on a phone
The Folly plays on a phone. The side panels become pills and sheets that slide up from the bottom. Tap once to see where something would go and again to place it; pinch to zoom and drag to pan. A swipe over a puzzle board scrolls the page (Keys and gestures).
I played before sign-in was needed
If this browser still holds a crag you played without an account, signing in brings it along when your account has no crag yet, or only an untouched one. When your account already has a crag of its own, the game shows you both and asks: carry on with your account's crag (the other is left behind), or cancel.